Webmarket WordPress Theme Documentation
- Author: ProteusThemes
- Support: ProteusThemes Support
- Theme on ThemeForest: Webmarket - WordPress Theme
- Version: 2.3.8
- Created: 2013-12-20
- Last modified: 2016-10-11
General
Thank you for purchasing the Webmarket WordPress Theme crafted by ProteusThemes.
Below you will find the documentation how to use the theme.
Setup
Installation
I assume you already have the fresh copy of WordPress installed on your server.
You can install the Webmarket WP Theme the three different ways:
- Using Envato WordPress Toolkit - preferred method
You can install any theme you purchased on the ThemeForest by installing Envato WordPress Toolkit plugin. Just follow this tutorial by wpmudev team. This is preferred method, because you will be able to update the theme to newer version (we are continuously improving all our products) from within the WordPress dashboard, like you update the plugins or official themes. - Upload a zip file
When you are logged in the Wordpress go to Appearance → Themes → Install Themes → Upload and select the zip filewebmarket.zipyou downloaded from the ThemeForest and click Add New button. - FTP upload
Unzip the contents of thewebmarket.zipfile and upload the folder namedwebmarketto your server towp-content/themes/folder using FTP client.
Once your theme is on the server, activate it by clicking the Activate button. Congratulations! Now the Webmarket WP Theme is fully installed.
Once the theme is activated you will be asked to install the required and suggested plugins. Without these plugins the theme might not work as expected.
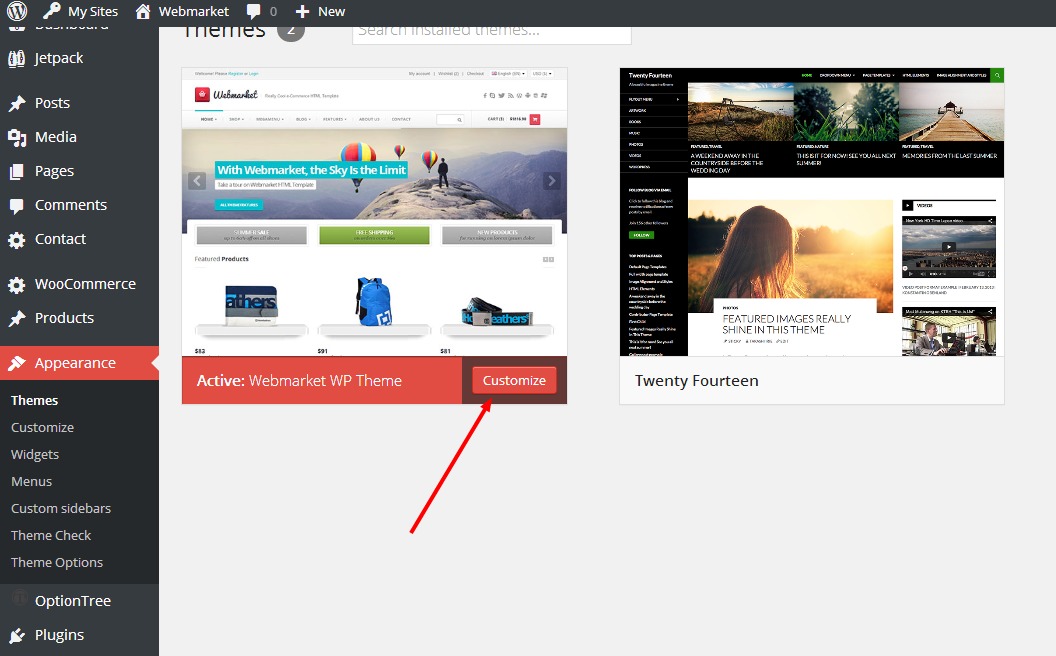
Customize the Appearance
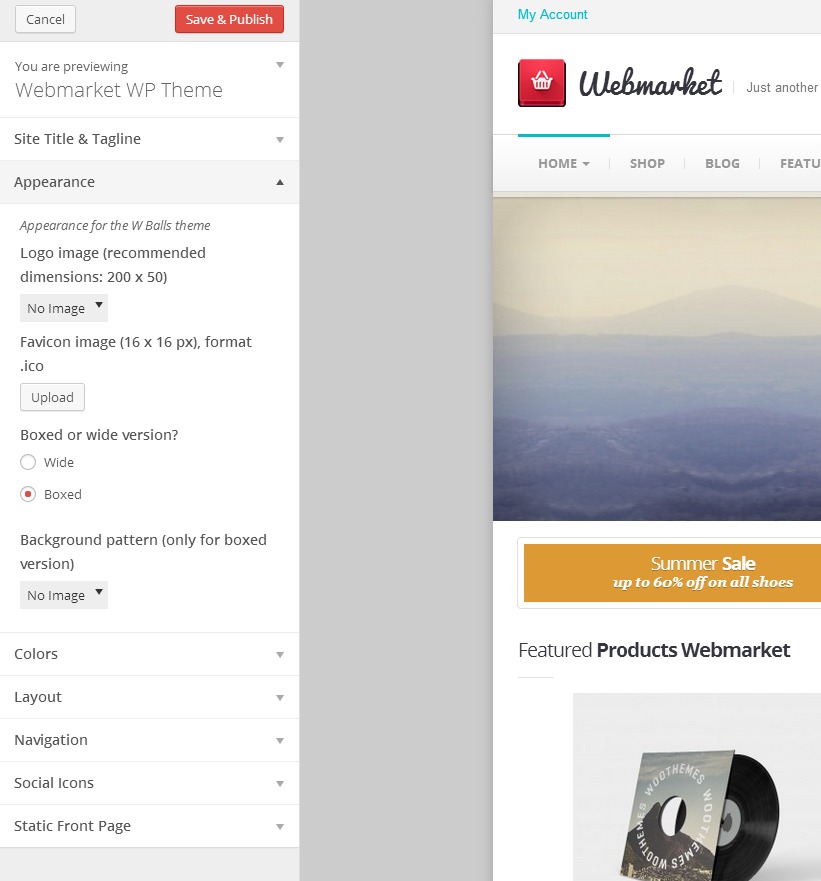
You can fully customize the appearance of the Webmarket Theme. Go to the Appearance → Themes and click on the Customize button:
The new window appears and you can now customize the appearance of your theme - upload your custom logo, change the base color theme and much more:
Demo Content
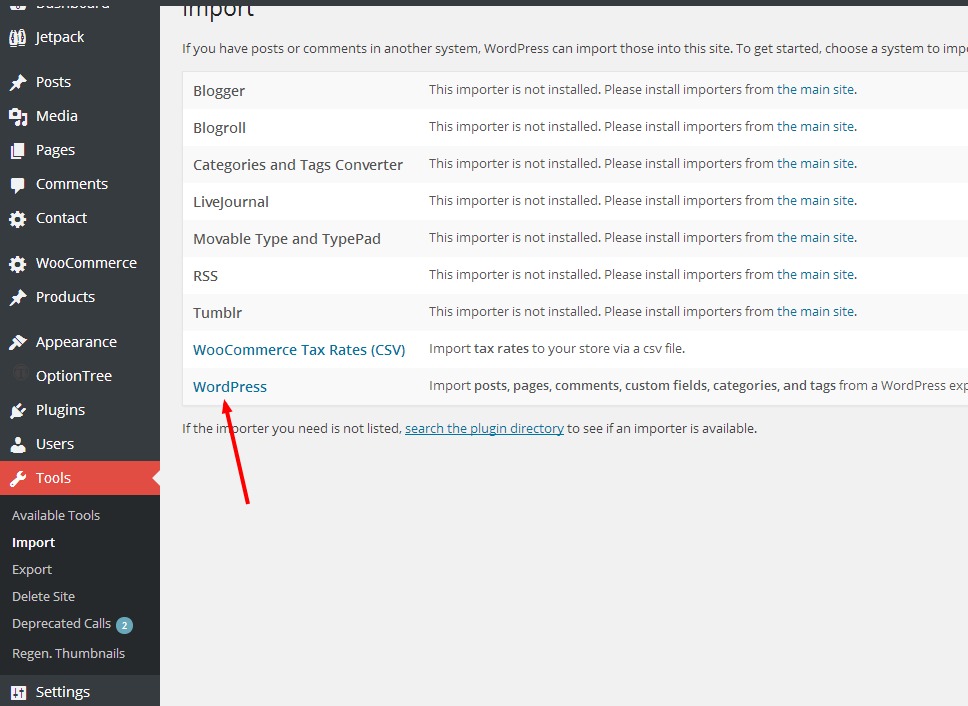
You may want to import the demo content, just like like on our preview site.
The demo content XML file is located in extras/demo-content.xml.
In your WP administration navigate to Tools → Import and select Wordpress. You will be asked to install the plugin. Install it and after that you will be able to import the demo file with all the demo pages, posts, settings, sliders ...
Note that this will not import the widgets, you have to place the widgets on your own.
WordPress Plugins
Just after the theme activation you will be asked to install the required and recommended plugins which work together with the theme:

We recommend that you install them all (required and recommended) to use all the features the Webmarket offers.
WooCommerce
Webmarket WP is WooCommerce ready.
Once the WooCommerce is activated you will see this notice:
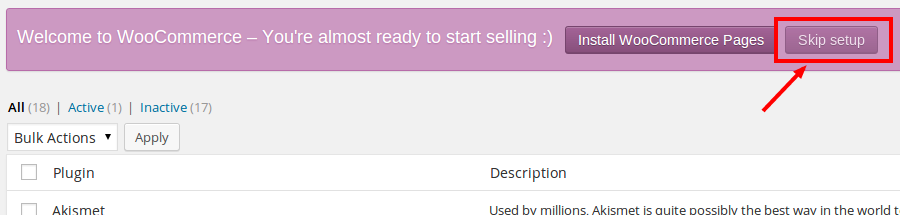
Click the button to skip the pages install if you imported the demo content for Webmarket before. Then select the right page for the Shop page in WooCommerce → Settings → Products → Display and the Cart and Checkout page in the Checkout tab.
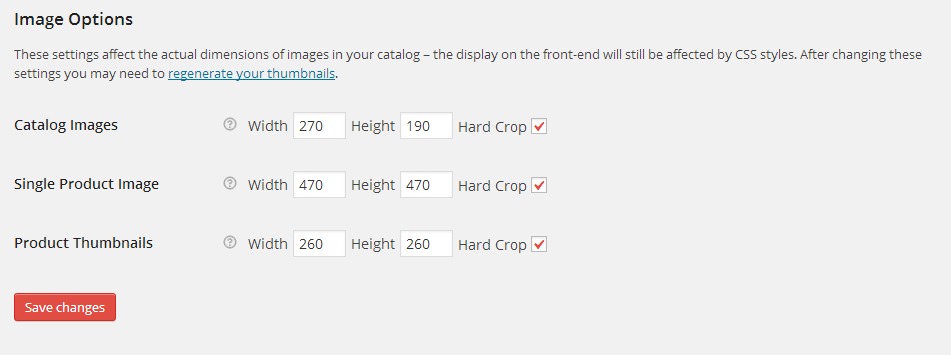
The next step is to configure the plugin settings in the WooCommerce → Settings. There are number of tabs at the top, you should configure them to fit your needs. Most importantly, in the tab Products → Display we recommend to use these settings for the Image Options:
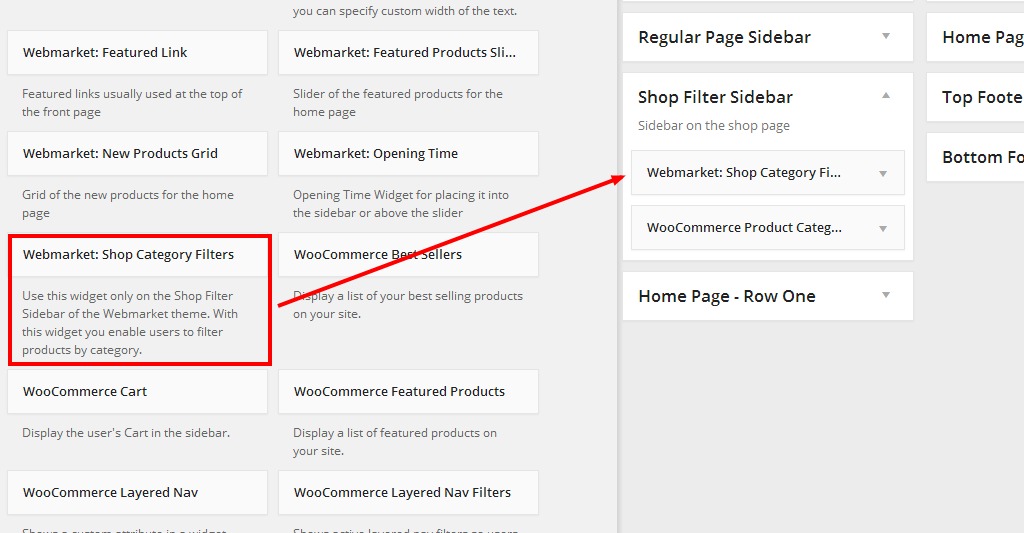
When you are done with the settings, go to the Appearance → Widgets. We developed special filters for the products. The widget is called Webmarket: Shop Category Filters.
Drag & Drop this widget to the sidebar called Shop Filter Sidebar. You can add other Widgets from WooCommerce there as well if you like.
That's all, your WooCommerce shop is now ready!
All further information and documentation for the WooCommerce you can find on official website.
Slider Revolution
The theme comes with the Slider Revolution WP Plugin which is used for the front page templates.
Read the original docs for more information.
Once you prepare the slider, just grab the alias of the slider and copy / paste it to the page meta box which uses the slider revolution.
Contact Form 7
The form on Contact Us page is made using the Contact Form 7 WP Plugin: http://wordpress.org/extend/plugins/contact-form-7/.
You can use the contact form builder to build the form to collect the data you need. For the same appearance as on the demo you can paste the following code below to the Form: field of the plugin:
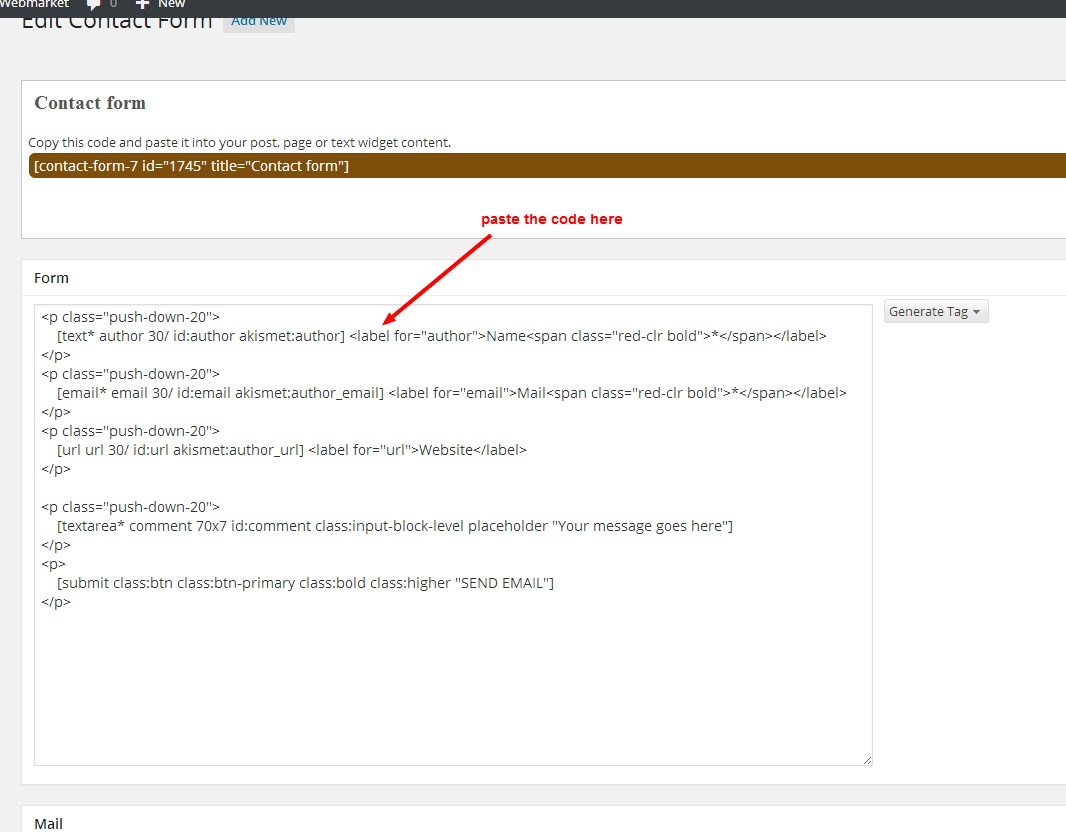
Form
<p class="push-down-20">
    [text* author 30/ id:author akismet:author] <label for="author">Name<span class="red-clr bold">*</span></label>
</p>
<p class="push-down-20">
    [email* email 30/ id:email akismet:author_email] <label for="email">Mail<span class="red-clr bold">*</span></label>
</p>
<p class="push-down-20">
    [url url 30/ id:url akismet:author_url] <label for="url">Website</label>
</p>

<p class="push-down-20">
    [textarea* comment 70x7 id:comment class:input-block-level placeholder "Your message goes here"]
</p>
<p>
    [submit class:btn class:btn-primary class:bold class:higher "SEND EMAIL"]
</p>
Message body:
From: [author] <[email]>
Website: [url]

Message Body:
[comment]

--
This e-mail was sent from a contact form on Webmarket
After that just place the plugin's shortcode to your contact us page.
Twitter Widget
On demo page we use Emebedded timelines (https://dev.twitter.com/docs/embedded-timelines) which can be generated in the Twitter Widgets and the JS code provided can be copied directly to the regular Text Widget:
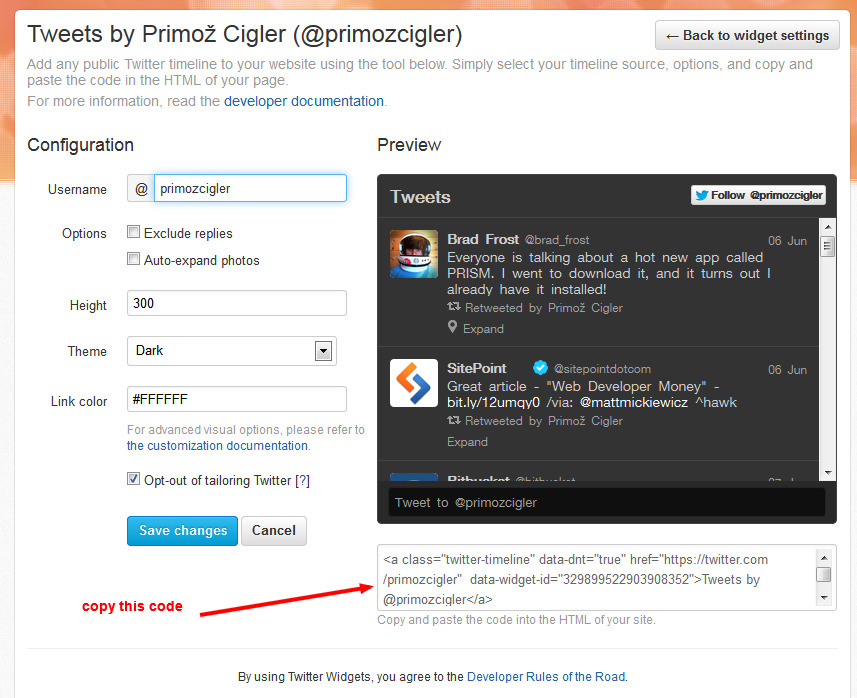
When you copy the HTML/JS code just paste it to the regular Text Widget:
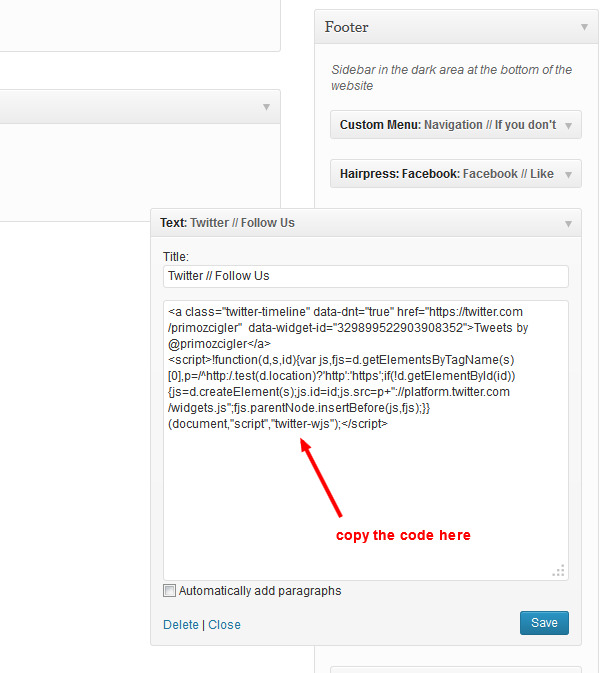
And that's all!
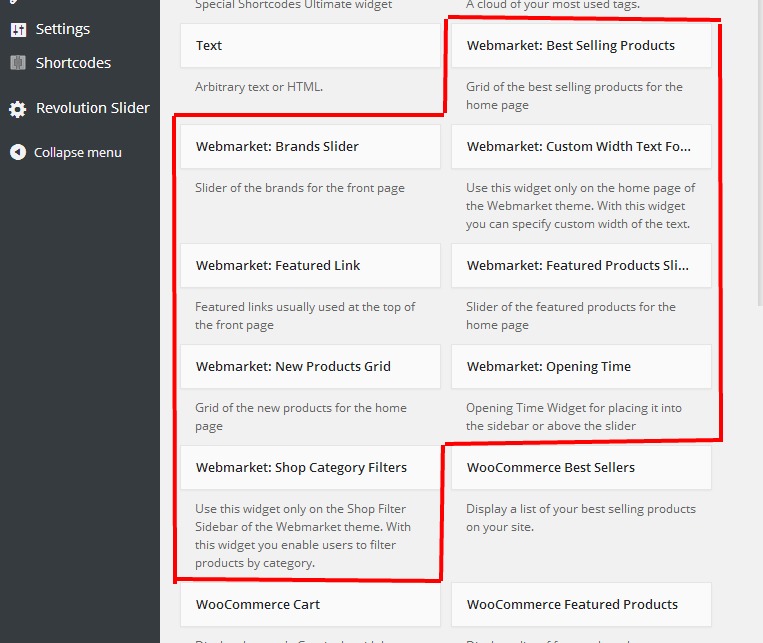
Widgets
There are several widgets you can use with the Webmarket WP Theme:
- Webmarket: Best Selling products - available only when WooCommerce is active
- Webmarket: Brands Slider - for the home page, slider of the brand logos
- Webmarket: Custom Width Text For Home Page - allows you to add the text widget which is wider or narrower than 4 columns to the widgetized front page
- Webmarket: Featured Link - for the top on the home page
- Webmarket: Featured Products Slider - available only when WooCommerce is active
- Webmarket: New Products Grid - available only when WooCommerce is active
- Webmarket: Opening Time - timetable of the opening times, used in the demo for the contact page
- Webmarket: Shop Category Filters - available only when WooCommerce is active
There are 9 different sidebars associated with the theme by default, so you can easily decide how the different layout types will look like. Further more, with Custom sidebars WP plugin you can create unlimited number of the sidebars for each page/archive/post separately.
Custom sidebars plugin
See the documentation of this plugin to see how it works.
Shortcodes
Shortcodes Ultimate
Webmarket WP is using the plugin Shortcodes Ultimate with custom skin to insert most of the shortcodes to the content.
Enabling the custom skin
Skin webmarket should be copied to the folder wp-content/uploads/shortcodes-ultimate-skins/webmarket/ upon theme activation. If it wasn't, you have to move it from the folder wp-content/themes/webmarket/assets/ there.
UPDATE: Shortcodes Ultimate plugin does not offer the custom skin field in its settings anymore. To activate our custom skins for this plugin you have to go to Appearance -> Themes and activate another theme and then activate our Webmarket theme again. By activating the theme our custom skins for Shortcode Ultimate will get applied.
When this is done, you can insert the shortcodes when editing the page/post as shown in the video above.
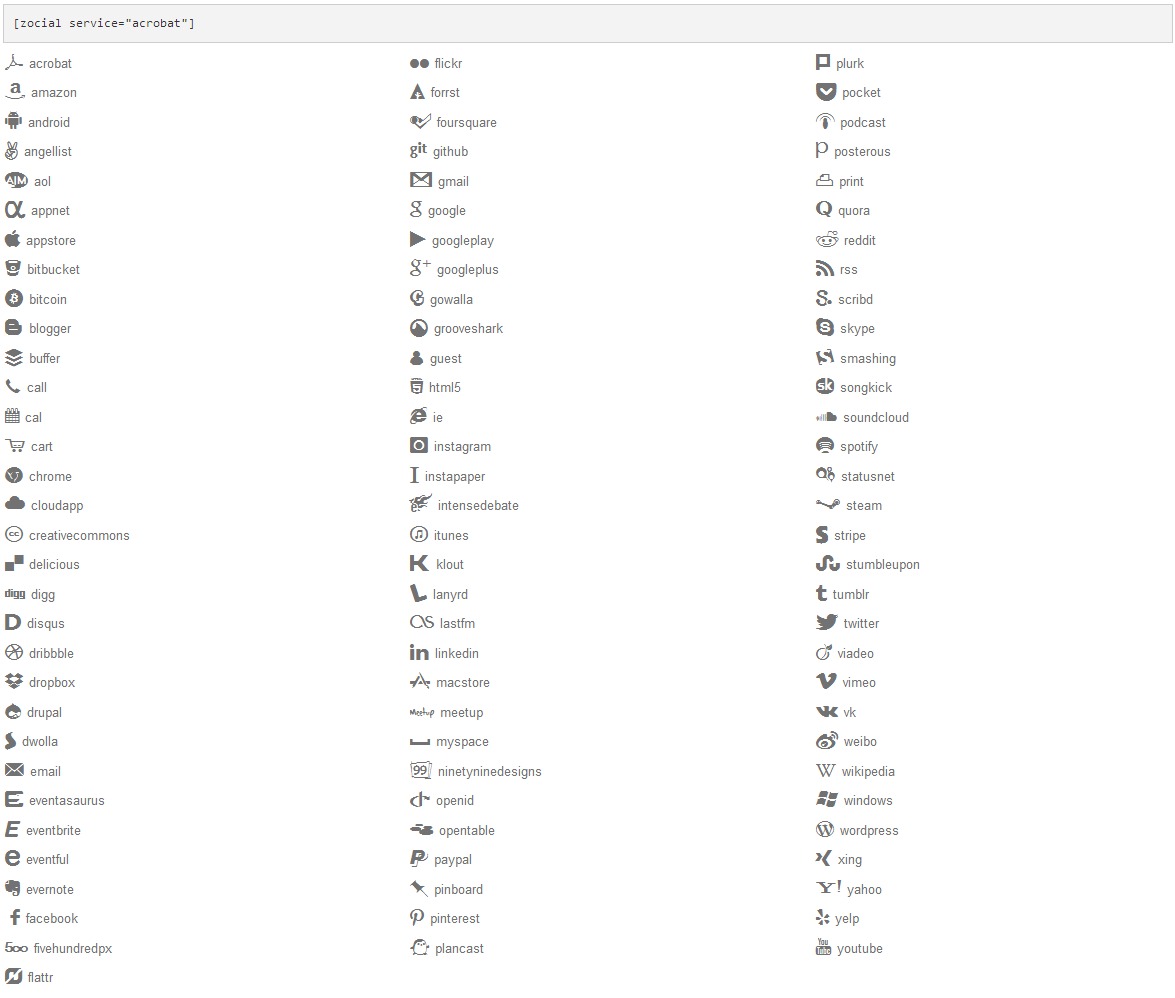
Social Icons
You can insert social icons of practically any service using the [zocial] shortcode, example: [social_icon service="twitter"].
The options for the social icons:
- service
-
Possible values:
FontAwesome Icons
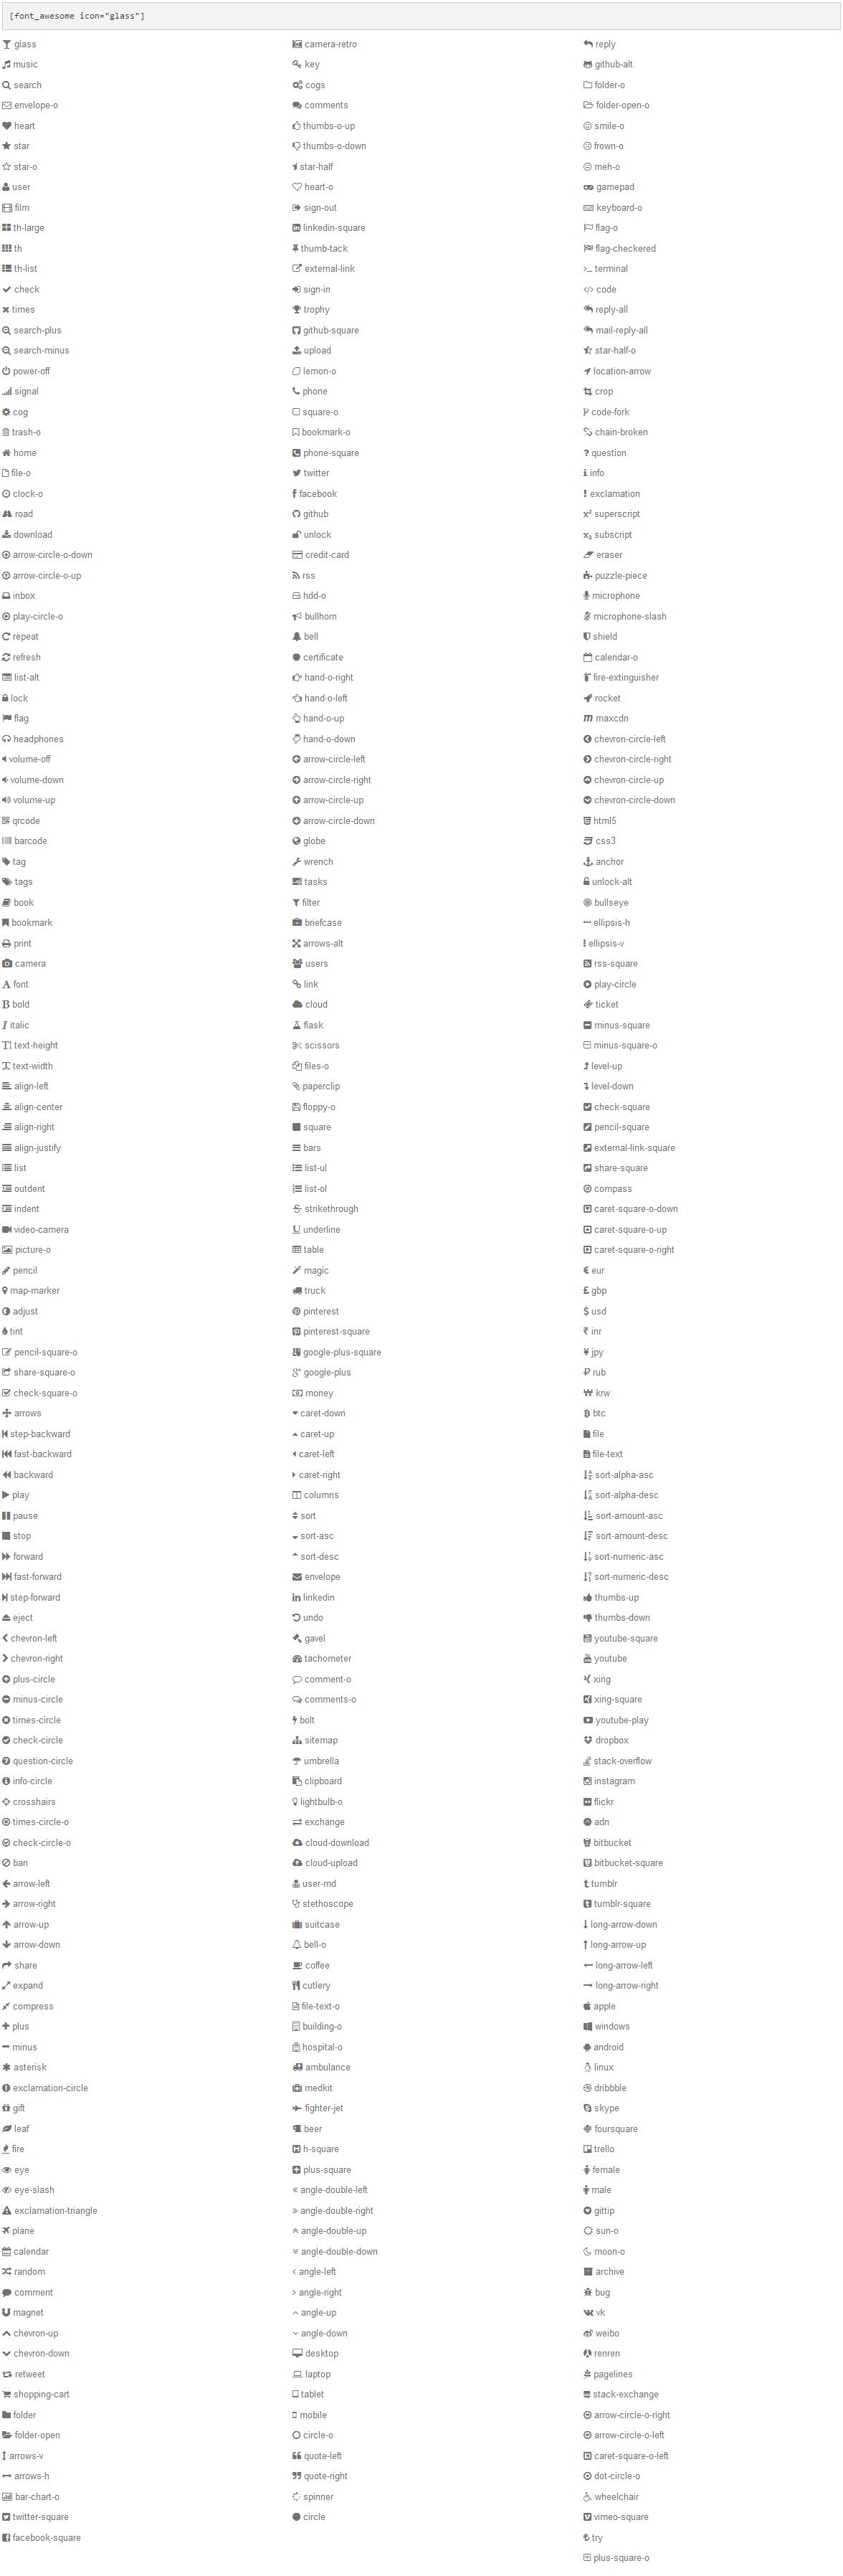
You can insert one of more than 300 icons using the [font_awesome] shortcode, example: [font_awesome icon="glass"].
The options for the FontAwesome icons:
- icon
-
Possible values:
How to Translate Webmarket to Other Languages
WPML
Webmarket WP officially supports WPML. Head over to the WPML website, buy the subscription, then download and install the following plugins:
- WPML Multilingual CMS
- WPML String Translation
- WPML Translation Management
After that the WPML wizard will guide you to properly configure the multilingual site.
For reference: the widgets and theme options can be only translated using the String Translation.
Manual translation
Webmarket WP Theme is translation ready out of the box. The translation .pot file is located in the theme's languages folder. There is already the example of the translation to Slovene: sl_SI.po and sl_SI.mo files.
First you need to change your entire language of WP installation to your language. This can be done in file wp-config.php in the root of your WP installation and then in wp-admin Dasboard → Updates you will notice that you can update the WP in your language.
Second, navigate to the folder of the Webmarket theme (wp-content/themes/Webmarket/) and in the folder translations (of the theme) you will find file webmarket.pot. Load this file (as the catalog) in the PoEdit and start translating. When done, save the .po file in the folder translations (there is sl_SI.po already there as an example) and name it the same as the defined WPLANG constant in the file wp-config.php. And that's it, refresh and your translation should work now.
References:
Miscellaneous
Custom Changes
If you need advanced cusomizations on the theme, we are available for that as well.
Just let us know your needs to: info@proteusthemes.com
For your general orientation: the prices for modifications start at the 200 EUR + VAT.
Changelog
Changelog of the theme is available on ThemeForest website.
Bonuses / Plugins / Tools used
- FREE BONUS: Slider Revolution for WP - find the documentation for the slider HERE
- WooCommerce WordPress plugin
- Shortcodes Ultimate WordPress plugin
- Custom sidebars WordPress plugin
- Contact Form 7 WordPress plugin
- jQuery - JS library
- Bootstrap JS - JS functions for Twitter Bootstrap
- CarouFredSel - carousel jQuery plugin
- Compass and SASS
- jQuery UI for price range slider/filter
Google Fonts
There are two custom fonts from Google Fonts used in the Webmarket WordPress theme:
Icon Fonts
There are two icons fonts used for maximum quality of the icons in the Webmarket:
- FontAwesome - library of 360+ icons
- Zocial - social icons
Source design PSD files
You will find PSD file included in the folder
./extras/
. There are master layers in it for the individual page layouts.
Images used for theme preview
The images available for theme preview aren't included in the WordPress theme because of the licences, but you can buy them at photodune.net:
All the other images are from the Horsefeathers clothing company and we use them in our demo/preview site with their permission, but we cannot include them in the WordPress pack for download.