Optimizing your workflow is crucial for the success of the project. It saves time, money, it improves communication with colleagues, clients and enhances the quality of the finished WordPress site.
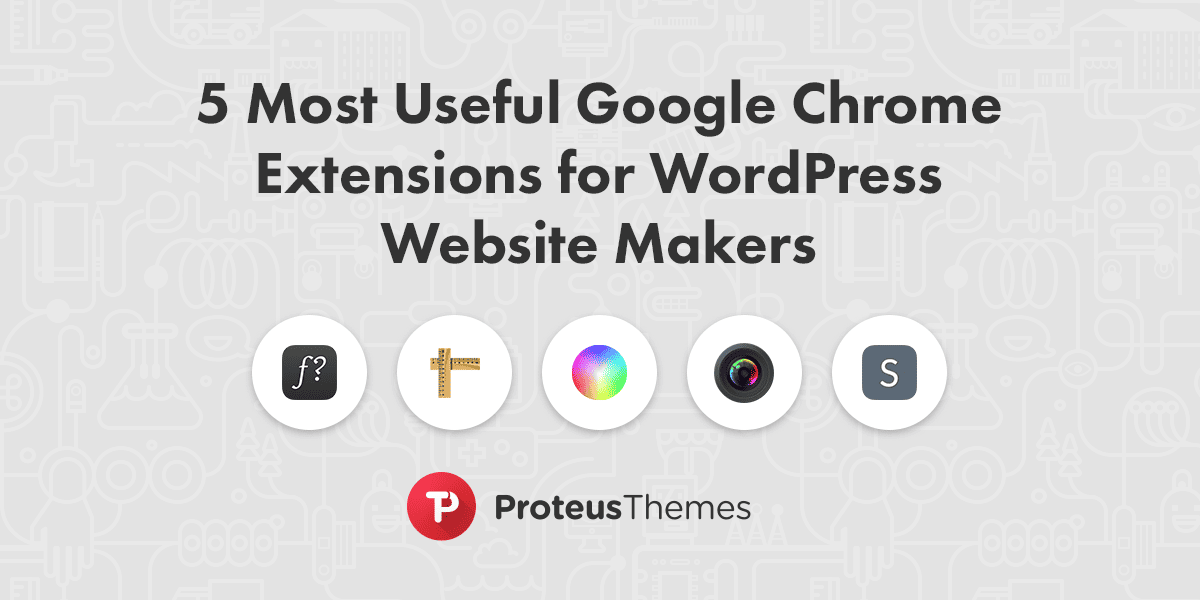
Nowadays, there is always an application, plugin or an add-on, which can help you do your task more efficiently. In this article, I wanted to show you what kind of extensions we use in browsers (specifically Google Chrome) at ProteusThemes to communicate, edit and analyse many types of content.
All 5 Chrome extensions I use are available for free and you can set them in just a few minutes. Let’s take a look at them:
– WhatFont
– Page Ruler
– ColorZilla
– Awesome Screenshot
– Stylebot
You can install all the extensions from Chrome Web Store. After installing the extension, its icon will be visible in the top right corner of browser’s toolbar, next to URL field. You run the extension or view all the options by clicking on its icon.
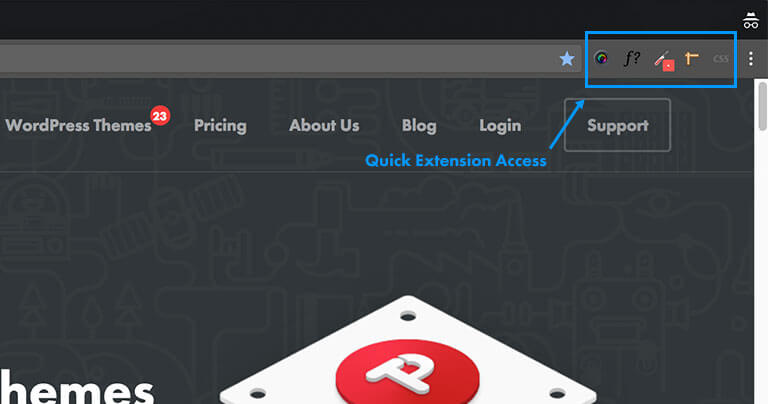
All installed extensions can be seen, modified, activated or deactivated, if you click on the menu at the end of URL field and select More Tools, or simply right click the extension’s icon to choose the needed option.
Let’s dive into details of each extension.
WhatFont
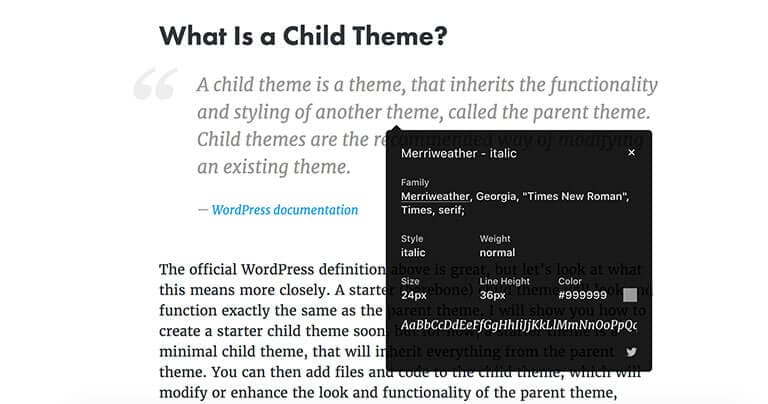
Have you ever been on a website and wanted to use the same font? You could go the hard way, searching for the font in the code, or you could use WhatFont. This extension identifies fonts used on different webpages by clicking on the text. The pop-up window shows all information about the font. You can also hover over the text to get the name of the font used.
I use this tool when I’m looking for inspiration for the next project or checking the final version of the WordPress website before going live. It is often used by web designers and developers when testing fonts in different browser resolutions.
The expansion shows the following characteristics of the font:
- Font Weight & Style (shows the weight and style of the selection).
- Font Family (shows the complete collection of typefaces from which the font is coming from, so you can track it).
- Font Size (is the size of the font used in current viewed resolution. Note that, when two different fonts are set in the same size, one often looks bigger than the other because of its differences. Size is shown in pixels and unfortunately the extension doesn’t have other typographic measurements).
- Font Height (is the height from the top of the capital letter to the bottom of the lowest descender, plus a small buffer space).
- Font Color (HEX color model of the font. Be careful when reading the text color of links. In some cases, selection shows the color of the link in hover mode).
- Google Fonts, Font Squirrel or TypeKit link (in some cases, the font is connected to a collection of interactive application programming interfaces, which allows you to browse and use web fonts from their website. Look for the same font or get a whole typeface).
- Characters (a sample of uppercase and lowercase letters is shown in the selected font).
Also note, that while using WhatFont, you won’t be able to interact with the webpage, only the scrolling on the page is active. You can click on multiple fonts to compare them, without losing the previous pop-up.
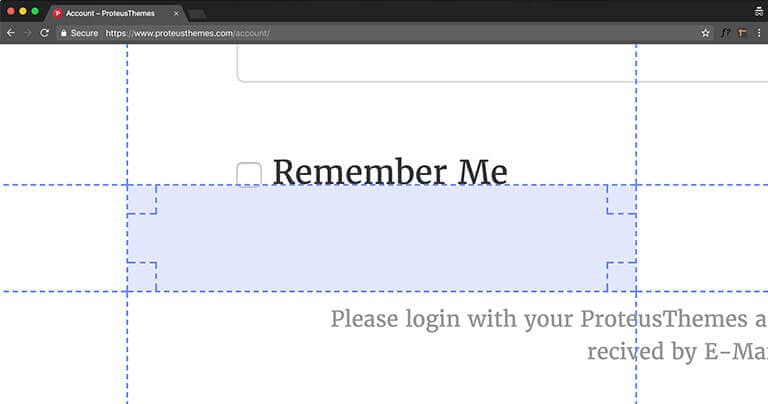
Page Ruler
Page Ruler lets you draw out a ruler to any page and displays the width and height of the element, and its position on the webpage. You will never again have to view the code or make screenshots and measure them in Photoshop. The tool is useful when checking the size and position of bigger elements on the webpage. For example, you can check all the paddings and margins with it. Smaller elements or details can also be measured.

How To Use Page Ruler
Start using the ruler tool, by clicking on the icon at the top right of the browser’s toolbar or press ALT + P. Blue ruler bar pops up, which displays width, height and position of the selection – left, top, right, bottom.
To make a selection, simply click, drag and release. The selection data is instantly seen in the blue toolbar. By clicking and moving the sides and corners of the ruler, you change the size of the ruler’s selection. You can also manually input the desired size or position, in the fields on the blue ruler bar. Another option, is clicking the small arrows in the fields to resize or move the selection. This allows you to make precise changes. Moving the selection, by dragging it from its center, is also available.
When you want to measure smaller details, zoom in on the webpage.The biggest benefit of this tool is, that the ruler won’t add any extra pixels to the selection when you zoom in.
Color of the ruler can be changed, to create a better contrast between the ruler’s selection and the colors used on the page element, so you can make more accurate measurements.
For measuring the space between two elements that are far apart, turn on “Show Guides” option, to display guidelines extending from the ruler edges.
You can dock the toolbar to the bottom of the webpage if it’s bothering you, while making measurements.
Enable “Element Mode” (click the light blue arrows on the left side of the toolbar) to outline the elements on the page, as you move your mouse over them. By clicking on the elements, you get a steady selection. The extension also displays and allows you to move between elements according to the website code.
Finding and moving between elements in Element Mode
The only downside of the plugin: if you need to get the size of the element in mobile view, you will have to use Page Ruler simultaneously with another resizing Chrome plugin (e.g. Window Resizer), because Page Ruler doesn’t work when you are on the webpage in developer mode.
ColorZilla
ColorZilla is an extension, which assists web developers and graphic designers with color related tasks. It’s usually used for making color pallets, getting inspired by color combinations or checking the color of a certain element. You can get a color reading from any part of the webpage, adjust that color and paste it into another program, without having to open another application.
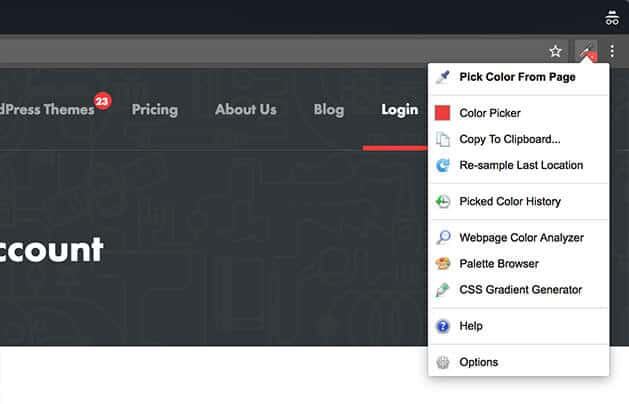
This tool provides color readings in RGB and hexadecimal format. Click on the ColorZilla’s eyedropper icon opens a menu of many options.
How To Use ColorZilla
The most common use of the ColorZilla, is to read the color of an element. Clicking on the “Pick Color From Page” allows you to pick any color from the currently displayed page. It opens a toolbar at the top of the webpage, which shows you a sample of the color, RGB and HEX color format, and the size and code of the colored element. The toolbar also provides options to select bigger patches of the colors, to calculate the average color.

You select and copy the HEX format of the color by clicking on it. Paste the HEX color code with buttons CTRL + V or CMD + V. For one time copy in a different format, you can open the dropdown menu, select “Copy To Clipboard” and choose the desired format.
The format can be changed for all next picked colors in options. There you can disable # format (66CAA6) and make HEX code in lowercase (66caa6). Don’t forget to save the changes.
The last color you picked is saved in the dropdown menu of the ColorZilla icon, under “Color Picker”. Color Picker stores history of picked colors, has an option to edit the color and you can copy it from here.
“Webpage Color Analyser” reads all the CSS colors used on your current webpage. Clicking on the color highlights each element in this color and shows RGB and HEX format of the color.
The built-in palette browser allows you, to choose colors from pre-existing color sets. One of the color related options is also “CSS Gradient Generator”, an advanced option for creating gradients.
Awesome Screenshot
Get Awesome Screenshot Extension
This extension makes it easy to screenshot and record webpages. It is also possible to import your local images, edit them and export them. At ProteusThemes we use it everyday to communicate internally as well as for the WordPress support we offer. The tool is very useful, if you are working remotely. Yes, there are many other extensions, which can do the same work, but we like Awesome Screenshot because it’s simple and powerful.
How To Use Awesome Screenshot
This expansion allows you:
– to capture visible part of the webpage (option for delayed caption),
– to capture selected area (select an area you want as an image),
– to capture whole webpage,
– to screenshot your desktop,
– to import and edit your local image and
– to record a video of the screen.
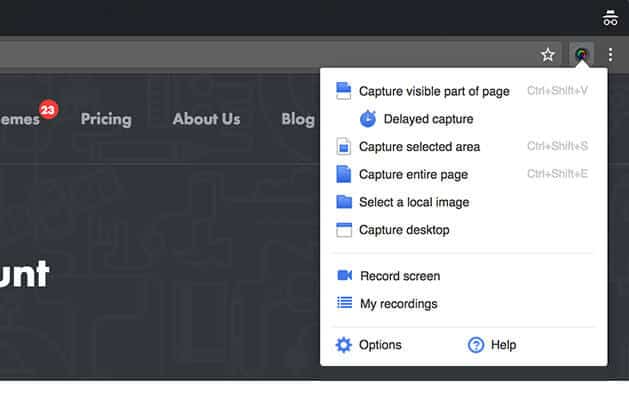
To select one of the ways to screenshot a webpage, click on the camera lens icon in the browser’s toolbar. Note that all actions, except delayed capture of the Awesome Screenshot, will be done instantly. The screenshots you make, will be saved as PNG or JPEG image. Desired format for the image can be chosen in the extension’s options, where you also have other settings, such as time of delayed capture, shortcodes and a folder, in which you want images to automatically be saved.
If you want mobile view of the webpage or to make a screenshot of your WordPress webpage in another resolution, you can go in developer mode to modify it or to activate any other resizing expansion first (e.g. Website Resizer).
Before saving the screenshot, you have a chance to edit and comment it. Scroll through your capture, crop it and easily blur the portions, which contain private data. You can annotate the image with text, circles, arrows, and lines in different colors, for emphasis and clarity. Zoom in and out with magnifier icons to view the image before saving.
Toolbar and screenshot editing options with Awesome Screenshot
Once you’re happy with the result, save the image to your computer, cloud, share it or print it.
This expansion also has an option to record 30 second screen video for free. You can make tab or window video. Videos can be saved in WebM format, transferred to Google Drive or directly uploaded on the YouTube. Your recordings can be found in the Awesome Screenshot dropdown menu under “My Recordings”.
The only two downsides of the extension are, that when you zoom in the browser, the capture of the selected area doesn’t work and many users can’t get nice screenshot of the websites with sticky elements.
Fun trivia fact: most of the screenshots and videos you are looking at in this article were made with Awesome Screenshot.
Stylebot
Stylebot allows you to edit and manipulate CSS of the website for your viewing only. You will need some CSS knowledge to make precise and long-term changes on the website’s CSS. If you only need it for a quicker preview of changes on your WordPress page, advanced CSS knowledge is not required. This tool is used to change all possible elements, add new ones, delete them and to make a different layout of the website, so you can make perfect screenshot, fix unwanted mistakes or save that CSS of the website, so the changes will be also seen in the next visit. Style of the website you created, can be imported or exported and shared with others.
For more advanced editing, Stylebot is used in combination with developer mode to identify elements on the page.
How To Use Stylebot
To open the Stylebot, click on the CSS icon in the browser toolbar or press ALT + M. If you don’t have much programming skills, I suggest you to choose the Basic mode at the bottom of the newly opened column.
The Advanced mode opens a text field, in which you write CSS code for the selected element. Here, it’s easier to work in combination with developer mode to find the name of the element you want to change from the nested elements and continue the editing in Stylebot. If you would like to use many editing modes at the same time, you can. The simple edits will be translated into code, visible in Advance or Edit CSS mode.
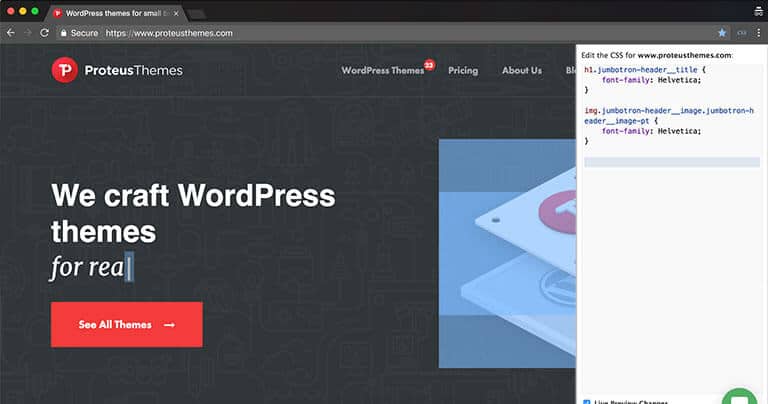
“Edit CSS” option opens a field for CSS code, which will be applied to the whole website and can be saved, shared and used the next time you visit the website. All the changes you’ve made, will be visible. Note that all changes you make, will stay, if you refresh the website. To remove styling, click on the Stylebot icon and choose “Remove Styling”.
The basic mode has simple sections for quicker and easier editing of the website. We sometimes use it as a quick preview tool (e.g. to test how a bigger heading would look like, to change color of the background etc.). Beginners could easily use it from the start.
Here you can change:
– text,
– colors, backgrounds,
– borders,
– layout & visibility.
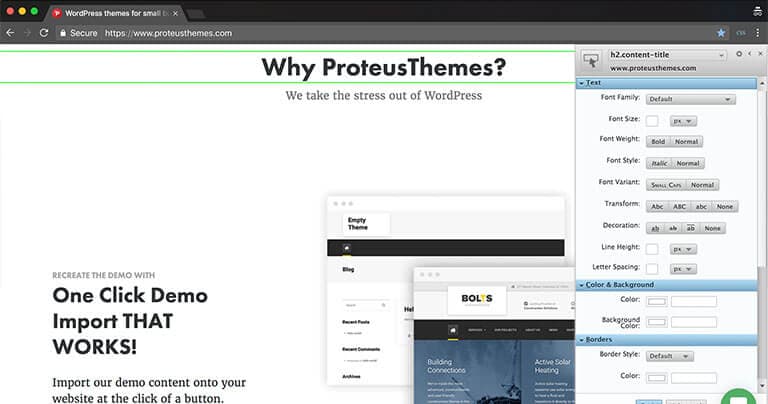
You manually pick an element on the website (highlighted with green border) with a cursor. The name of the element will be shown at the top of the Stylebot column. For a new selection, just click on the top left icon in the column. Drop-down-arrow at the title of the element, provides you with previously selected sections. When the right element is selected, you can start changing the website by entering the values and picking pre-styled options. Editing options in basic mode are limited. You can change the font size, color of the text, paddings and margins, etc.
To make your Stylebot editing or viewing experience more pleasant, click on the Stylebot icon and choose Options. Here you can make personalized shortcuts, pick preferred editing mode, enable and disable your styles applied on different websites, import and export styles, etc.
So here are only 5, most essential and powerful extensions, which we use on a daily basis at ProteusThemes and can make your workflow easier too. Do you think otherwise? Would you recommend better alternatives? Leave a comment.