This is the second article of a 3-part series on the topic of custom post types (CPT). The topics that are discussed in the other two articles are:
In this blog post we’ll look at how to create a custom taxonomy and how to connect it with a custom post type.
What is a custom taxonomy?
Let’s begin with just, what is a taxonomy? I like the official WordPress definition: A taxonomy is a way to group things together.
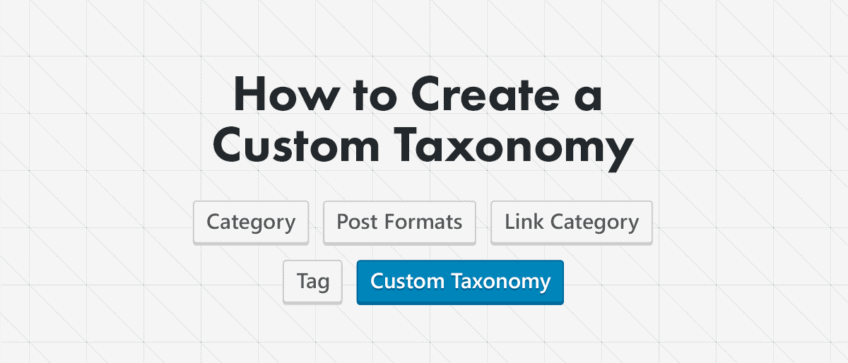
WordPress has 4 default taxonomies: Category, Tag, Link Category and Post Formats. Definitely the most used of the four are categories and tags. The category taxonomy lets you group posts together in logical categories, that you can define yourself. The tag taxonomy is very similar, but can be used more freely. A single group in a taxonomy is called a term. Each taxonomy also has its “index” page, where all posts of the same term are displayed (the URLs of these pages look like: ‘taxonomy/term’).
So a custom taxonomy is just what the name suggests, it’s your own custom group of posts (or custom post types). If we had a book review as a custom post type a good custom taxonomy example would be book genres.
Just to refresh the memory: In the previous article about Custom Post Types, we used the example CPT of Testimonials for our Shaka theme, so we will continue to use that here as well.
So, we have the Testimonials custom post type. What kind of custom taxonomies would we want? Which groups would make sense for this use case? We could group testimonials based on which service they were referring to. So we could have a custom taxonomy of services (surfing, kiting, diving). Another custom taxonomy could be locations, where the users have experienced this service and so on.
You can create a custom taxonomy for each logical group that you can think of.
How can you create a custom taxonomy?
Just as with custom post types, there are two ways to register a custom taxonomy. You can create it with a plugin or you can write a bit of PHP code.
The reasons and use cases for when to do it via a plugin or with code are the same as for the CPTs, so please check it out in the first article.
Here we will just look at how to create the custom taxonomy and how to connect it with the custom post type.
Create a custom taxonomy with a plugin – the easy way
We will use the Custom Post Type UI plugin, to register the custom taxonomy, just like we did for the CPT in the previous article:
- Install and activate the Custom Post Type UI plugin from your wp-admin dashboard,
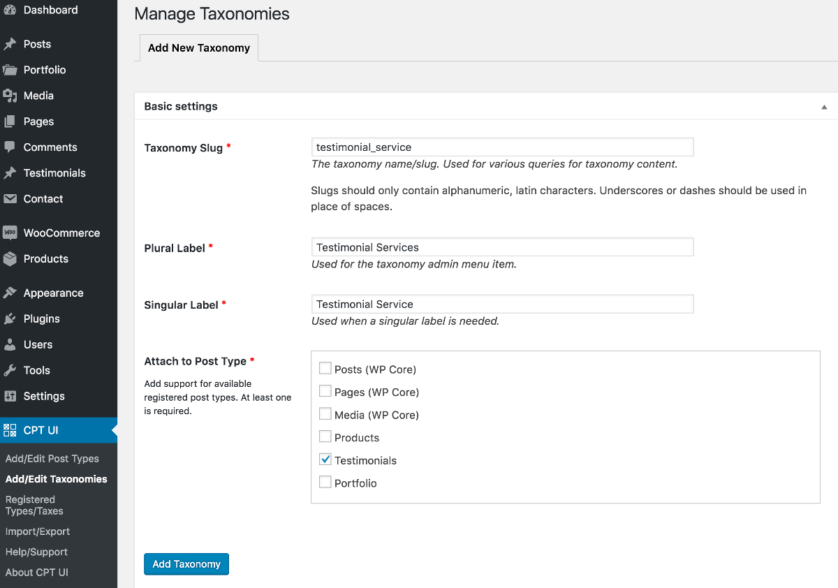
- Once you activate the plugin, the CPT UI admin menu item will be available. Go to CPT UI -> Add/Edit Taxonomy
- Input the taxonomy slug, plural and singular name and then you have to select which post type to attach this newly create custom taxonomy (other default settings are ok). In our case we named our custom taxonomy: testimonial_service and we attached it to the testimonials custom post type, that we registered in the previous article:
- If we now look at the screen for creating a new testimonial custom post type you will see the Testimonials Services meta box on the right side and also a sub-menu item on the left:
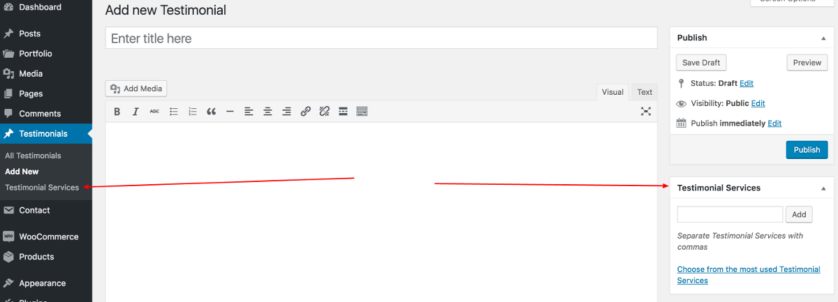
- That’s it, we can now add new services which will group the testimonials based on the services that they refer to.
Create a custom taxonomy manually – coding involved
Yes, the title does say coding involved, but that’s not actually true 🙂
You can use the WP code generator to generate the custom taxonomy code. Just click through the tabs at the top and input the details of your custom taxonomy. The generator will output a valid custom taxonomy registration code:
// Register Custom Taxonomy
function custom_taxonomy_testimonial_service() {

	$labels = array(
		'name'                       => _x( 'Testimonial Services', 'Taxonomy General Name', 'text_domain' ),
		'singular_name'              => _x( 'Testimonial Service', 'Taxonomy Singular Name', 'text_domain' ),
		'menu_name'                  => __( 'Testimonial Services', 'text_domain' ),
		'all_items'                  => __( 'All Items', 'text_domain' ),
		'parent_item'                => __( 'Parent Item', 'text_domain' ),
		'parent_item_colon'          => __( 'Parent Item:', 'text_domain' ),
		'new_item_name'              => __( 'New Item Name', 'text_domain' ),
		'add_new_item'               => __( 'Add New Item', 'text_domain' ),
		'edit_item'                  => __( 'Edit Item', 'text_domain' ),
		'update_item'                => __( 'Update Item', 'text_domain' ),
		'view_item'                  => __( 'View Item', 'text_domain' ),
		'separate_items_with_commas' => __( 'Separate items with commas', 'text_domain' ),
		'add_or_remove_items'        => __( 'Add or remove items', 'text_domain' ),
		'choose_from_most_used'      => __( 'Choose from the most used', 'text_domain' ),
		'popular_items'              => __( 'Popular Items', 'text_domain' ),
		'search_items'               => __( 'Search Items', 'text_domain' ),
		'not_found'                  => __( 'Not Found', 'text_domain' ),
		'no_terms'                   => __( 'No items', 'text_domain' ),
		'items_list'                 => __( 'Items list', 'text_domain' ),
		'items_list_navigation'      => __( 'Items list navigation', 'text_domain' ),
	);

	$args = array(
		'labels'                     => $labels,
		'hierarchical'               => false,
		'public'                     => true,
		'show_ui'                    => true,
		'show_admin_column'          => true,
		'show_in_nav_menus'          => true,
		'show_tagcloud'              => true,
	);

	register_taxonomy( 'testimonial_service', array( 'testimonials' ), $args );

}
add_action( 'init', 'custom_taxonomy_testimonial_service', 0 );
You can paste this code into a newly created plugin or in the theme functions.php file. I’ve pasted the code directly into the functions.php file, because it’s more convenient for this example. The Testimonial Services sub-menu item has appeared under the Testimonials admin dashboard menu and the meta box is there as well, just like on the screenshot in the plugin setup above.
The manual registration of custom taxonomy is working, so let’s analyze the code and see exactly what it does. The code structure is very similar to the custom post type registration in the first article, but it varies in a few settings and function calls:
- We hook the
custom_taxonomy_testimonial_servicefunction into the WPinitaction in order to register the custom taxonomy, - The first block of code inside the function is an array of labels, where you can change the words that will be used when creating/editing custom taxonomies. Tip: I would recommend that you use escaping internationalization functions. So instead of
_x()and__()I would useesc_html_x()andesc_html__(), - The second block is an array of arguments/settings for the custom taxonomy. You can take a look at the official WP documentation, to see which arguments you can set,
- With the
register_taxonomy( 'testimonial_service', array( 'testimonials' ), $args );call, we register thetestimonial_servicecustom taxonomy that will “attach” to thetestimonialscustom post type with the$argsarguments.
Now that we have the custom post type and the custom taxonomy registered, we just have to display them on our WordPress site. This will be the topic of the next and final blog post about custom post types.