Following this guide, you will learn all techniques to drastically speed up a WordPress site. Here are the most important reasons why having a great page speed loading time in WordPress benefits your business: users will not abandon your website, they will spend more time and money there, and search engines will rank your website better in search results. Ready?
Intro
Internet users do not have a lot of patience, when it comes to page loading times. We click on a link or input the URL and we wait a second, two, three and that’s it. Google statistics state, that 50% of users expect a mobile site to load in 2 seconds and 53% users are likely to abandon the page, if it’s loading longer than 3 seconds. That’s a very short period, if you consider that the average loading time of a homepage, on a mobile device, is 19 seconds (on a 3G network). Loading times on computers are faster and an average loading time is 5 seconds, but that’s still too long.
Taking desktop website benchmarks as a reference is not an excuse anymore. For most of the websites today, the majority of the traffic comes from mobile devices. In this article, we’ll take a full look at the most up-to-date techniques for page speed optimization for WordPress sites. Following this guide, you will be able to speed up WordPress site, reducing the mobile and desktop loading times drastically, and therefore make it much more user-friendly.
If you don’t have a WordPress site, don’t close the guide yet. Most of the speed optimization techniques explained in this step-by-step guide, can be applied to any type of website.
If your site was built with monetization in mind, whether it’s an online e-commerce store or if you’re selling online/offline services, missing out on potential customers is never a good thing. You’re basically leaving money on the table. Improving your page speed should have a positive impact on your earnings. Fun fact: Obama fundraising campaign increased donation conversion by 14% with site optimization and decreasing the page load time from 5 seconds to 2 seconds.
As website owners or developers, we want our visitors to have the best experience. We create great looking sites with awesome functionality, but we usually forget the importance of a fast website. A fast website builds trust with our visitors, it increases the chance a visitor will stay on our page longer and therefore they might spend more. On the other hand, if our website is slow, the visitors might just give up and they won’t even see our awesome website, with our equally awesome offer.
If the reasons above weren’t persuasive enough, I have one more. Google and other search engines (SE) revealed, that having a slow website will push your search engine ranking down, leaving your with even fewer visitors. So, having a fast website means, that Google will like you more and this can drastically change your SE rankings in your favor.
Of course, loading times vary for a couple of reasons, for example, the visitor’s internet speed, visitor’s location and how “heavy” or bloated our website is. There is nothing we can do about the visitor’s internet speed, but we can take care of other aspects and improve experience for everybody. In this guide, we will look at how to optimize our WordPress website for speed, to make it fast and lean, so let’s go!
Table of Contents
- Foundations
- WordPress Page Speed Optimization Steps
- Final Results
- Conclusion
Foundations
In order to make your website as fast as possible, we have to build it on good foundations. Just like building a house, you don’t want to build it on quicksand and have problems right at the beginning. You want to build it on solid foundations, so it will last for a long time without any problems. The three main things to check are:
- hosting
- the WordPress theme
- the WordPress plugins
WordPress Hosting
Hosting is the very foundation of your WordPress website and is therefore a crucial component, which should not be overlooked, even if you already have a hosting. Switching to a better hosting provider will speed up your WordPress loading time for up to several seconds.
Selecting the right web host is important and you should not base your decision on the price of the hosting. Usually, with low prices, you get low performance and this is what we want to avoid. Let’s look at the hosting options available and explain what the differences are.
Shared Hosting
This is the most widespread hosting solution because it’s cheap. But as we said, with low prices, you get low performance. On a shared hosting, there are thousands of accounts on one physical server, which means that the server resources are shared between all websites created by these hosting accounts.
Imagine a big pizza (hmmm ?…), each website on a shared hosting gets a very tiny piece. But because your site has many visitors, it needs more pizza! It’s still hungry, but there is no more pizza :(, because other websites are hungry too… 🙂

If getting only a tiny slice of pizza is not bad enough, then potential security risks will probably make the shared hosting case even worse. An infected website on a shared hosting could cause speed and performance problems for the whole server and endanger your WordPress site as well.
The server configuration on shared hostings are very limited and you don’t have a lot of breathing room to configure it to your liking. The server is preconfigured to specific, usually very generic settings, and it should run WordPress without a problem. Problems arise later, in a form of running out of memory or in a form of a restricted PHP setting, that a plugin would need to function properly.
I can’t really recommend shared hosting for any business website, but if I had to, I would have to say, it’s most suitable for very low traffic sites.
Managed Hosting
This is a big upgrade from shared hosting, because your website gets a bigger piece of pizza (a whole pizza slice, yeah!), but it costs more.

The servers on the managed hosting are less populated and that translates to more server resources for your site. These servers are usually optimized to run WordPress as smoothly as possible, they have more memory, processing power and a caching system in place.
The hardware and software installation and configuration of these managed hosting servers are done by the hosting company (hence the word “managed”). Other services, such as backups, load balancers, disaster recovery and security checks/preventions, can also be a part of the managed hosting, depending on the offer of the hosting company.
Managed WordPress hosting is recommended for low to medium traffic websites.
VPS or Dedicated Servers
If we stick to the pizza analogy, with VPS (Virtual Private Server) you get a few pizza slices, but not the whole pizza and with dedicated servers, you get the whole pizza.

This means, that with dedicated servers, you have control of the whole server with all its resources and with the VPS, you get a portion of the server because you are still sharing the physical server machine with others. When it comes to page speed optimization for WordPress, there are no server-side limitations when you are setting up your WordPress on either VPS or dedicated server. You know exactly how much resources there are available for your website and you can configure it to your liking. You can implement cutting edge features before the standard hosting providers support them (which can lag years behind the server software technology).
Both of these options offer greater control and resources, but they also come at higher prices and demand more skills to set them up and maintain on the long run. VPS/Dedicated servers can also be managed, so you don’t need to be a server guru to use one. They are appropriate for websites with high traffic volume.
If you are not sure which hosting to go for, I would suggest the managed WordPress hosting option, which should also be able to scale (allocate more resources from the server), if needed.
A free website optimization, that every decent hosting offers by now, is to upgrade the PHP version to 7.x. If your WordPress site is running on PHP lower than 7, like 5.6 or even older, then please contact your hosting support and ask them to update it to the latest stable version. If you are looking for a new hosting, you can ask their support, if they have PHP version 7.x. They should all respond with a solid “yes”, but if they don’t have the option to use PHP 7.x, then I would recommend staying away from them. PHP 7 is, in comparison to older versions, a great improvement when it comes to speed and performance and it’s very easy to switch to it, so take advantage of it.
A good hosting choice will save you a lot of pain down the road and if you do come across a problem, a good customer support should be able to help you out, so I would also keep in mind to choose a host that offers good support. One quick trick you can utilize: ask them a pre-purchase question and monitor their response time, attitude and level of professionalism.
WordPress Theme
When we are choosing a WordPress theme for our site, we always start with the design of the theme and that’s OK. We should first pick a few themes that we like, because we want our site to be awesome and a great design is the first thing a visitor sees. The second thing is probably the functionality of the theme. Does the theme or the theme recommended plugins offer the functionality that we want? If it does, great! We are in business! What we almost always forget is to check how fast the theme loads.
We can test the loading time of the theme demo page and we’ll quickly see, if the theme is optimized for speed. We will check which page speed tools to use and how to use them in a section below, but for now, I just want to let you know about this extra step of theme verification, before purchase. Of course, the loading time of the demo page can probably be improved, so if you don’t get a perfect score, don’t worry, no WordPress theme will get a perfect 100% score, except, if it has very little content on its demo page. As a rule of thumb, you should look for themes that are not in the red figures (score 50 or lower on the page speed tools).
It comes down to a good balance between theme design and functionality vs. theme speed. For example, an empty WordPress theme with a bit of a text, will load very fast, but a bloated theme with a lot of functionality (most of which you might not need), with a lot of multimedia content, will load much slower. Hitting that sweet spot is the goal, when selecting a good and performant WordPress theme.
WordPress Plugins
A question I see popping up a lot is: “How many plugins is too many?”. It’s not a problem in the number of WordPress plugins, but in the code quality and impact the plugin has on the system. You can have 50+ active plugins, with each of the plugins taking care of a small specific functionality (with good code) and the site will run OK. On the other hand, you can have 5 active plugins and one of them could be clogging your system, making your WordPress slow.
Going over the code of each plugin is a good idea, but “ain’t nobody got time for that” 🙂 , plus you would need good programming knowledge to do so. If you do go down that road, the things to watch out for are plugins that enqueue many external resources, make a lot of HTTP requests, make unnecessary (unoptimized) database queries and so on (basically anything that would slow the WordPress website down, without a proper reason behind it).
What I would recommend is to not install and activate each plugin you think you need.
For better page speed, do not install and activate each plugin you think you need. Share on XFirst think about it, does your site really need this added functionality? For example, if you need a button shortcode, check your theme documentation, maybe the theme has a shortcode for it and you don’t need to install and activate a whole shortcode bundle plugin just to use a single buttons shortcode. This is a trivial example, but I want you to think before installing and activating new plugins. Each unverified plugin could make your site heavier and therefore slower, plus it could lead to security breach, if the plugin is poorly coded or unmaintained.
Lastly, one great thing you can leverage on, when selecting the plugin, is a large WordPress global share and consequently a huge community. With lack of coding knowledge, a good rule of thumb is sticking with the popular plugins with lots of active installs, good average rating score and positive reviews. Fellow WordPressers will make your selection a whole lot easier! 😉
WordPress Page Speed Optimization Steps
Before we start with the optimization, I would like to mention a few things.
Firstly, you should create a backup of your WordPress site, here is a guide on how to do that with a WordPress plugin. Better safe than sorry!
Secondly, I would warn you not to expect the 100/100 score in the page speed tools we will use in our guide. Going after the 100/100 score is not a good idea or even possible on some sites. It all depends on what kind of content your site is displaying. If a site only has a bit of text and an image, then sure, a perfect score is totally possible. But if you have a long page, with a lot of multimedia content and other 3rd party app integrations, like google maps and so on, then the 100 score is not in your sights and you should also not pursue it.
Why is it not a good idea to go for 100/100? If you follow instructions of the page speed tools and optimize everything as they say, then your site might not function properly. If you move all the blocking JS or CSS files to the footer, then the CSS flashing would appear (unstyled content would appear first and when the CSS would load, the site would “flash” into place), the same would happen with JS code, that would modify any DOM elements after the JS code would load.
You might break your site, if you blindly follow instructions and keep optimizing your WordPress site for a better loading time, just to get the perfect score. The perfect page speed score is just a number, which doesn’t actually matter, if your visitors end up with a broken site. We have to search for the balance of page speed and user experience.
Don’t pursue 100/100 PageSpeed Insights score for your business website! Here’s why -> Share on XFor the demonstration of WordPress page speed optimization, we will be using my shared hosting account and our medical WordPress theme (with the theme recommended plugins). Yeah, yeah, I know that I basically said not to use a shared hosting, but we will see what it’s capable off and what the limitations are, plus this is just a page speed optimization test, not an actual business WordPress website 🙂
I’ve installed the latest version of WordPress, the MedicPress theme, all theme recommended plugins and I’ve imported the demo content. This is our starting point for the test site.
Page Speed Tools
Page speed optimization can be hard, but thankfully, there are online tools that make our lives easier and advise us what to do, in order to improve the speed of our website.
The first rule of optimizing your WordPress for speed is this: always measure!
The first rule of website speed optimization: always measure! Share on XRun the tools (or at least one of them), that we will take a look at in the section below, after each optimization step and keep track of the improvements. This way you will know, which tasks bring in the biggest improvements. You should also run tests multiple times, to see the real average loading time.
Pages load differently, depending on where the hosting server is located. For example, if your server is located in the North America and the visitor is from Europe, the page will load slower for him, than it would for a Canadian visitor. This issue can be fixed with a CDN (Content Delivery Network), but we will look at this a bit later on in the article. For now, I just wanted to point out, that this issue is present for visitors across the world and also for page speed optimization tools. Some tools also allow you to perform the test from different locations, so you can see how that affects the loading time.
The page speed tools we will look at are:
There are other tools, but these are the most popular ones and we’ll stick with them.
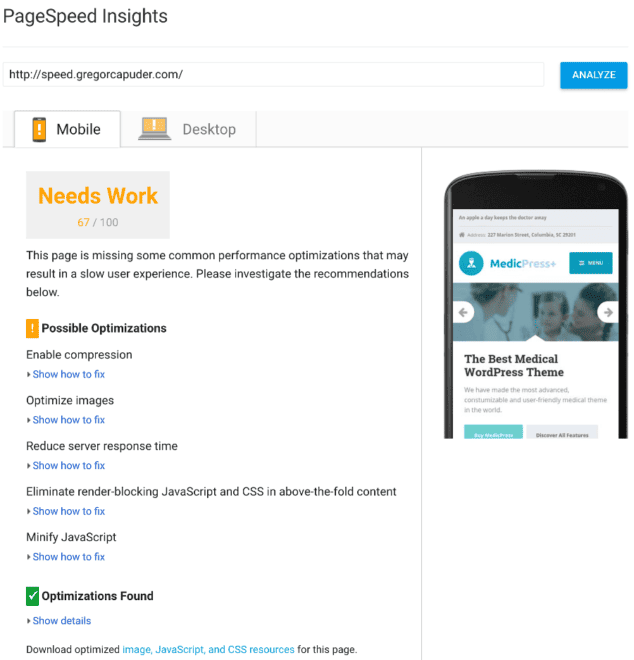
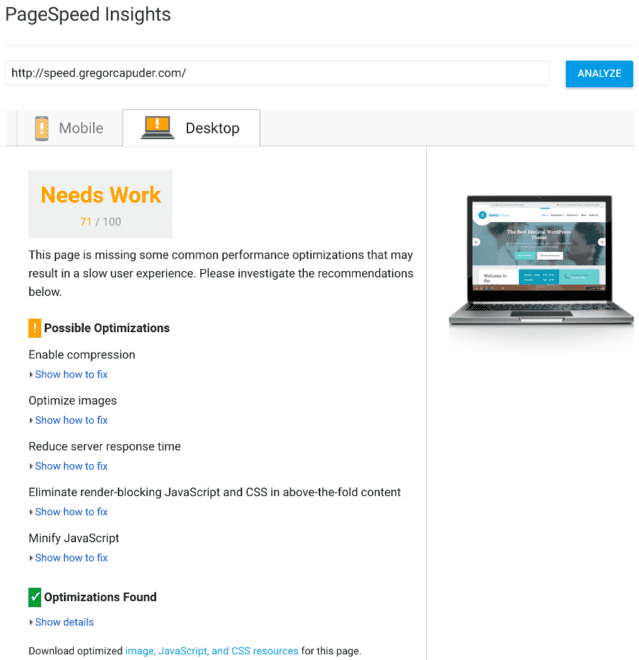
Google PageSpeed Insights
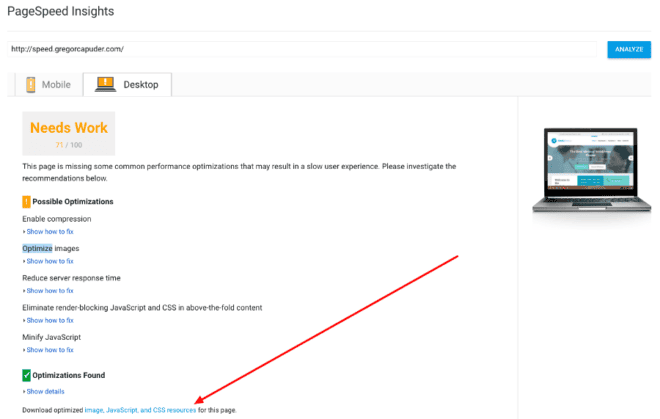
As you can see from the title of this tool, this is a Google’s product. Next to the score (split into desktop and mobile) and the useful instructions on what to do to improve your page loading time, we can also draw a conclusion on what Google likes to see on a website. Which things it wants to be optimized on a website to rank good in the search engine results.
If you have any unoptimized images or resource files (JS or CSS), it will generate a zip file with their optimized counterparts, which you can replace on your server. Pretty neat, right? We will look at image and code optimization later on, just know that Google PageSpeed can help you with that.
Google PageSpeed Insights does not have a lot of detailed information, like other tools, but it’s a good starting point, which covers all the important aspects of page speed optimization. It lists the steps that will improve your site the most.
I’ve run this tool with the URL of our test site and I got a score of 71 for desktop and 67 for mobile, so there is room for improvement. The list of possible optimization suggestions includes:
- Enable compression (compressing resources with gzip or deflate),
- optimize images,
- reduce server response time,
- eliminate render-blocking JavaScript and CSS in above-the-fold content,
- minify JavaScript.
GTmetrix
This tool gives you more detailed information about which things are optimized and which are not. Each optimization detail is listed and rated on a scale from 0-100. The list is ordered by importance, so if you follow the tasks from top to bottom and optimize the ones that don’t have a 100% score, you’ll be on a good path to speed up WordPress site as quickly as possible.
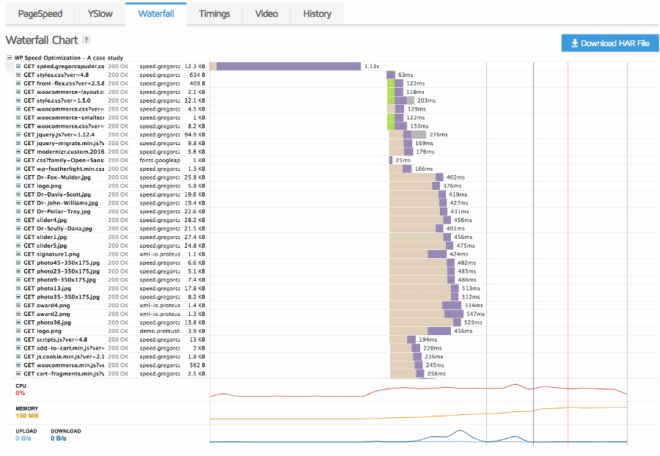
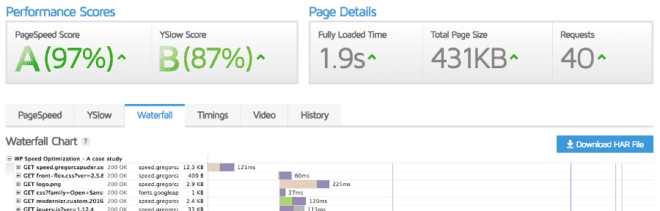
Using PageSpeed and YSlow test tools, GTmetrix generates scores for your page and displays the tasks that need to be improved. A nice feature of this tool is also the Waterfall report, which will graphically represent how your site is loading and you can spot the bottlenecks faster. In the image below, you can see that my slow shared hosting took 1.13s to respond with the first information. That’s way too long, but we will be able to improve that.
You can also test your page from 7 different locations across the world, which is nice and also an important thing to test, which we will see later on in the article.
I’ve ran the GTmetrix tool (location: Vancouver, Canada) on our test site and I got a PageSpeed score of 77 and a YSlow score of 71. With this tool, we also get this useful information:
- Fully loaded time: 3.1s,
- Total page size: 803KB
- Requests: 54
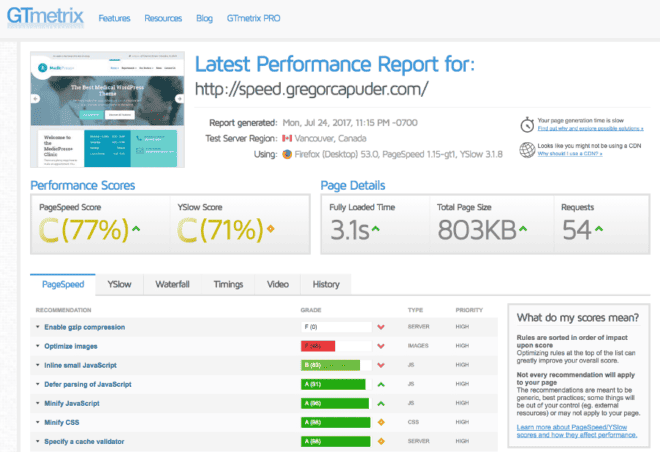
I like the GTmetrix tool the most, since you get a lot of relevant information in one place. We will mainly use the GTmetrix tool for measuring our optimization progress in this guide.
Pingdom Website Speed Test
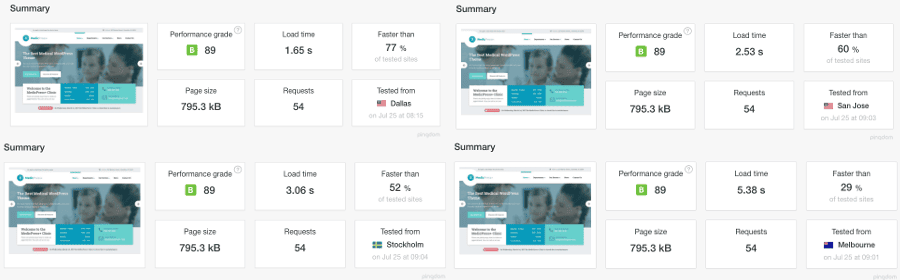
Pingdom is another tool, which displays the optimization information a bit differently. You get the same basic summary data as on the GTmetrix tool (without the YSlow score). With Pingdom, you have an option to test the page speed on 4 different locations. Results are all different for each location, which shows that server location is important, but we will be able to improve that as well (with CDN later on in the article). We will be using Pingdom tool to test page loading times on the 4 locations available, since Pingdom tests complete quicker.
Pingdom also displays some interesting tables, like content size or number of requests, filtered by the content type or by domain and it also has a waterfall report.
WebPageTest
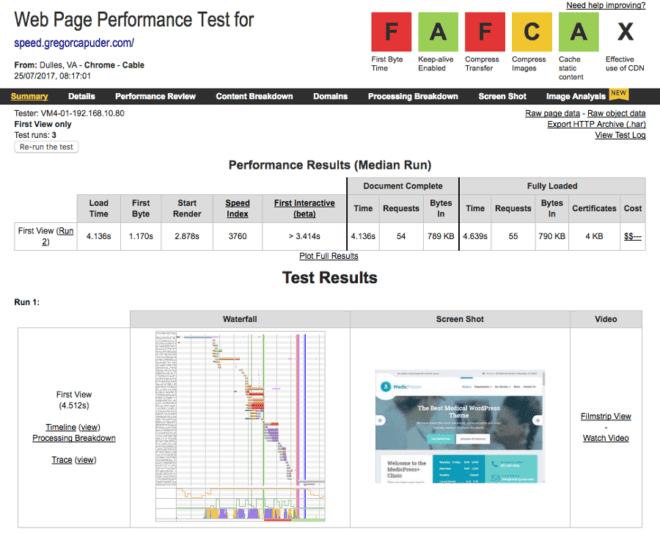
WebPageTest tool has even more configuration options than the previous tools. It has more locations to choose from, an internet speed can be selected, you can enable/disable a few browser options and you can test specific devices.
It’s a good tool, which displays a detailed waterfall report for each run (by default it makes 3 runs, but you can change that in the settings) and it displays an A to F grade for each of these speed optimization factors:
- First byte time (response time),
- keep-alive enabled,
- compress transfer (gzip),
- compress images,
- cache static content,
- effective use of CDN.
You can go into details, by checking all result tabs, where you will find a lot of useful information. I would use this tool, if I needed a detailed report or if I needed to test a location available on their site, otherwise I think the GTmetrix has more concise information.
I ran this tool for our test site. You can see the results in the screenshot below:
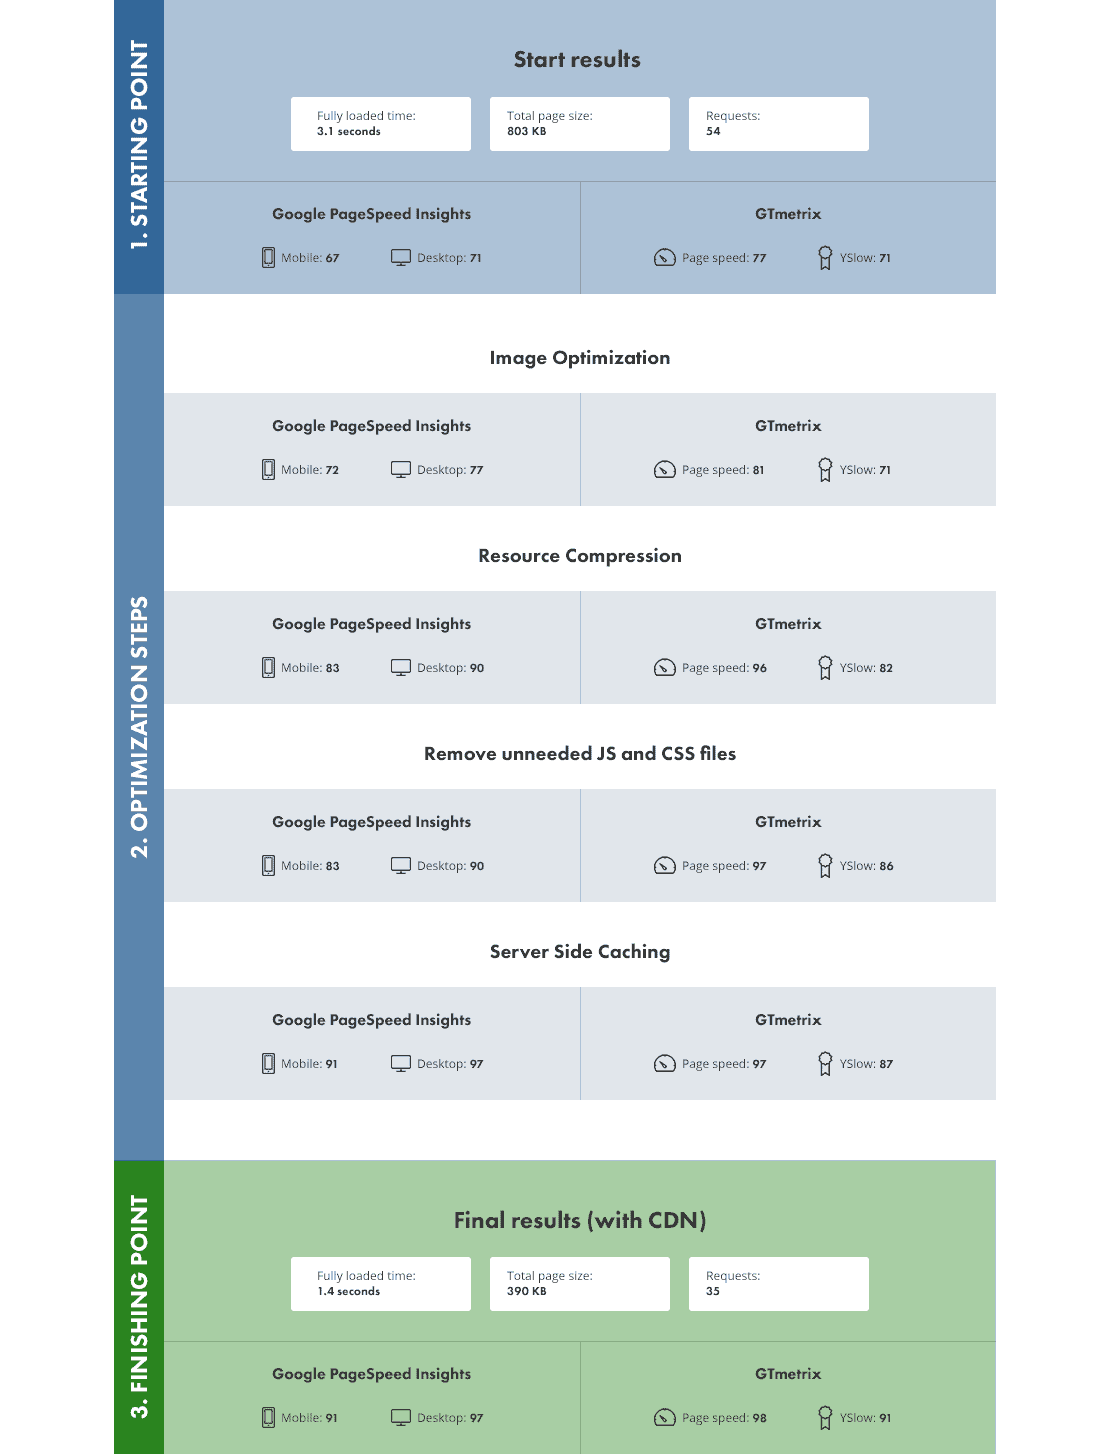
We looked at the more popular page speed tools and we made the initial page speed tests, so now we are finally ready to start optimizing our WordPress site. For reference, these are the starting point results from the page speed tools we will be using for measuring our speed optimization progress:
- Google PageSpeed Insights
- Mobile: 67
- Desktop: 71
- GTmetrix
- PageSpeed: 77
- YSlow: 71
Image Optimization
This is probably the most ignored aspect of site performance and at the same time it can bring the biggest improvement to your site speed. If you never think about optimizing the image before you upload it to your WordPress site, then this is a great first step for your WordPress loading time optimization.
Uploading big, unoptimized images, used in a small place on your website is a big “no no”. Example: you have an image slot that will not be bigger than 600 x 400 px on your site and you upload a 1920 x 1080 px image (or even bigger!). Now, you repeat this mistake a couple of times and your site will be very slow.
The first thing to do, is to resize the image to the proper size. In our example, the image slot will never be bigger than 600 x 400 px, so we should resize the image to that size.
“That’s it, job done, right?” Nope. We can improve the image even further. There are a lot of tools, that optimize (compress) the image without losing its quality (our eyes can’t detect the quality loss with these tools). This will also drastically reduce the image file size, making it faster to load.
Image compression can be done manually or with WordPress plugins. My coworker Marko wrote a phenomenal guide for image optimization, so we will use the knowledge obtained from his article and quickly go over the techniques you can use to optimize your images.
Mini Guide for Image Optimization
Choose the right image format – the most popular image formats for online use are JPEG and PNG. You can save a lot on image file size, by selecting the correct image format (Marko saved 45% in his article). You should use:
- The .jpg format for photos, images with gradients and images with millions of colors.
- The .png format for images with limited colors (logos) and images with transparency.
Resize your images – As I’ve mentioned above, you should always resize images before uploading them to your WordPress site. Firstly, check how big the space where you will be using the image is and resize it accordingly. You can resize the images with an image manipulation program, like GIMP or Photoshop.
Compress your images – This can be done with an online image compression tool or with a WordPress plugin:
Online compression tool: Marko recommends the Optimizilla online tool. Simply upload your images to the Optimizilla app and once the process is complete, download the optimized images, which you should then upload to your WordPress site. This sounds a bit tedious, so of course there is a WordPress plugin, which can simplify this process.
WP image compression plugin: Again, Marko tested the most popular image compression plugins and declared a winner: ShortPixel Image Optimizer. After you install the plugin, you will have to request an API key in order to use the plugin (a very simple process). The default settings of the plugin are great, so you don’t need to set anything up, simply go to Media -> Bulk ShortPixel and click on the “Start Optimizing” button. Any newly uploaded image will also be optimized. Note: the free version of this plugin only allows 100 image optimizations/month, if you need more, you would have to switch to their paid plan. We want our customers having access to the best tools out there, so we’ve partnered with ShortPixel and now our ProteusClub members also get 1,000 credits free to use with the ShortPixel WordPress plugin.
Lastly, I cannot recommend enough that you read the whole article on image optimization in WordPress.
Google PageSpeed Optimized Images
This is an alternative way on how to optimize your existing images on your WordPress site. If you followed the steps above, in the Mini Guide for Image Optimization section, then you have probably already optimized images and therefore Google PageSpeed will not have any images for you. Good job! You can still read this section for informational purpose 🙂
I mentioned in the Google PageSpeed tool introduction, that Google generates a zip file with optimized files you can use on your site. You can download the zip file, by clicking on this link:
In this zip file, you have a folder called image, which has the optimized images. You can upload them via FTP or your hosting file uploader. Replace/overwrite the images in the correct uploads folders (…/wp-content/uploads/…). After that, you should also generate the smaller versions (thumbnails) of these images in your WordPress site. You can do that with the Regenerate Thumbnails plugin.
Other Image Improvements
In this section we’ll look at some further improvements concerning images, that we can take advantage of, to squeeze some extra performance.
Lazy Loading Images
Lazy Loading is a technique for loading images, where images are loaded asynchronously. Images which are not above-the-fold are not loaded on page load (they are loaded after or even only when they’re needed). This means, that images that can be seen at the top of the page are loaded, while other images (not seen) are loaded after the page loads or as the users scrolls down the page (on demand). If you have a long page with many images, you can save a lot of initial page load time with this technique.
Lazy loading can be implemented with some custom code or with a WP plugin. We will be using the WP Rocket caching plugin later on and it has a lazy load feature as well.
Image Hotlinking
What is hotlinking? It’s displaying an image that is hosted on another server. For example, if you have a very popular post and in that post, you have a nice image. A visitor (thief) might copy the image source URL and use it on his own site. That means, that the image will be requested and served from your server. Multiple the thief by a 100 and you have thousands of external requests that your server has to respond to, which can slow down your server.
This is not a direct page speed optimization, but rather a server optimization. You can solve the hotlinking issue with some code in the .htaccess file. You can go one step further (be a bit evil) and replace the stolen image with another, maybe not so nice image :). That can also be done in the .htaccess file. Open your .htaccess file on your server and add this code to it. Replace the your-website.com with your domain, the google.com with any other domain, that you want to allow to have access to your images and replace http://replacing-stolen-image-url-goes-here.jpg with the image URL you want to display for any stolen images.
RewriteEngine on

RewriteCond %{HTTP_REFERER} !^$

RewriteCond %{HTTP_REFERER} !^http(s)?://(www\.)?your-website.com [NC]
RewriteCond %{HTTP_REFERER} !^http(s)?://(www\.)?google.com [NC]

RewriteRule \.(jpg|jpeg|png|gif)$ http://replacing-stolen-image-url-goes-here.jpg [NC,R,L]
If you don’t want to replace the stolen image with your custom image, then use this code. This will disable the image on their website:
RewriteEngine on

RewriteCond %{HTTP_REFERER} !^$

RewriteCond %{HTTP_REFERER} !^http(s)?://(www\.)?your-website.com [NC]
RewriteCond %{HTTP_REFERER} !^http(s)?://(www\.)?google.com [NC]

RewriteRule \.(jpg|jpeg|png|gif)$ - [NC,F,L]
Case Study Improvements
Let’s look at the progress we’ve made with our test site so far, after optimizing the images. As you know, I’ve imported demo data for our medical theme, which we are using as our test site. These demo images were using the correct file formats and they were already sized correctly, so I could skip these two steps. If I was to upload a new image, I would not skip them!
So, I’ve installed the ShortPixel plugin and I’ve run the bulk optimizer. The plugin reported an average image optimization of 38%. That’s great!
I’ve run the PageSpeed Insights tool and Google pointed out that some of the images can be compressed even further, so I followed my own advice, used the images that Google prepared for me and I uploaded them to my server via FTP.
After the images were sorted, the page speed tools results were:
- Google PageSpeed Insights
- Mobile: 72
- Desktop: 77
- GTmetrix
- PageSpeed: 81
- YSlow: 71
Not a big improvement, since the images used in the demo data were already quite optimized, but still, we are one step closer to our goal. If you have unoptimized images on your site, then this image optimization step will bring you a huge increase in scores and lower the page loading time.
Browser Caching
When a user visits your site via browser, it has to download all resources (HTML, images, JS, CSS, … ) from your server in order to display the site for the visitor. When the same user visits another page on your site, the CSS and JS files usually stay the same, but the browser might still download them again from your server, if you don’t have a proper server configuration in place.
Proper caching headers and expiration dates should be set on your server, to allow static resources (JS, CSS and other files) to be stored in the browser’s cache. This greatly improves the performance for returning visitors or for visitors who look at more than one page on your site.
Usually, the hosting servers have that already configured. If the page speed optimization tools report that you are missing the “Leverage browser caching” optimization or something like that, then it’s best to contact your hosting company and let them know that you want to set-up browser caching for your site. They will be able to sort that out for you or at least point you to the right direction on how to do that yourself.
If you want to do things yourself, then you have to know that these browser caching settings vary, depending on the server type your hosting company is using. A good starting point for Apache servers is the .htaccess file of the HTML5 Boilerplate project (check out the “Expires headers” section). An nginx configuration is available as well.
My shared hosting account has browser caching already configured, so there is nothing for us to do on our test site.
Resource Compression (Gzip or Deflate)
Files sent from your server (HTML, JS, CSS, …) to your visitors can be compressed, so that they can be transferred faster, which improves your page speed. This can be done by enabling Gzip or Deflate compression on your server.
You can contact your hosting support and ask them, if they can enable resource compression for your site or you can configure it yourself, but be sure you know which server type your hosting is using. We can again look at the HTML5 Boilerplate project for some tips, they have default server configs for each of the major server types. For example, my hosting is using Apache server, so I found this compression config. I’ve copied the content of this config, I’ve located the .htaccess file for my WordPress site via the FTP (it’s in the root of your WP installation) and I copied it at the end of the file.
I’ve re-run the page speed tools, after I’ve enabled the resource compression for my WordPress site and here are the results:
- Google PageSpeed Insights
- Mobile: 83
- Desktop: 90
- GTmetrix
- PageSpeed: 96
- YSlow: 82
As you can see, we’ve improved our scores by a fair amount and all we did, was enable the resource compression, which did not take a lot of time. By compressing resources, we change the total page size from 803KB to 476KB, which is awesome! We made another step towards an optimized site, so let’s continue.
Remove unneeded JS or CSS files
If you are using plugins, which include JS or CSS files on all your pages and you actually are not using the plugin features on those pages, then it’s best to remove them. This can be done with custom code in your child theme, but I would recommend that you use a plugin for that. It’s much easier!
The plugin that will help us do that is WP Asset CleanUp. After you install and activate this plugin, go and edit your home page. Home pages are usually the “heavier” pages, so we will look at it for our example, but you can do that for other pages as well.
Under the page content editor, you will see a section called WP Asset CleanUp. This section will list all CSS and JS files that are included on your front page. Now, your job is to find out, which of these files are not needed on your WordPress front page.
For example, in our test site, we are using the Contact Form 7 plugin, but we are only using the contact form on our “Contact Us” page, so we can safely remove (unload) its CSS and JS files from our home page. I can do the same with WooCommerce assets, since we are not using them on our home page as well. You should look at each asset in the list and check, if you can unload it. Watch out for the files with the red exclamation icon, you should probably never unload these, since they are core WordPress files and they are needed for the site to work properly. This is how my home page Assets CleanUp settings looks like:

I was able to safely remove 11 assets, which will save 11 resource requests when a page loads and that will improve the page speed.
Re-run of page speed test tools showed, that Google PageSpeed Insights score did not change (because it also did not list this as a recommended optimization), but the GTmetrix score did improve:
- Google PageSpeed Insights
- Mobile: 83
- Desktop: 90
- GTmetrix
- PageSpeed: 97
- YSlow: 86
Our site also loads faster, it now needs 2.7 seconds to load the whole site (in the beginning it took 3.1 seconds). We are improving the WordPress site speed slowly but surely. Bear in mind, I’m using one of our WordPress themes for the test, which are built from the ground up to be performing out of the box. If you’re using some other WordPress theme, where the author didn’t put any efforts to optimize it for speed, your improved loading speed results will most probably be much greater at this point.
With removing unneeded JS and CSS files from our home page, we improved our scores, load time, number of request and the total page size as well. Good job!
Render-blocking JavaScript and CSS in above-the-fold content
One of the optimizations that Google PageSpeed Insights suggests is also: “Eliminate render-blocking JavaScript and CSS in above-the-fold content”. This is a tricky one. Remember when I said, that it’s not good to chase a perfect score in the page speed tools? This is one of the reasons for that.
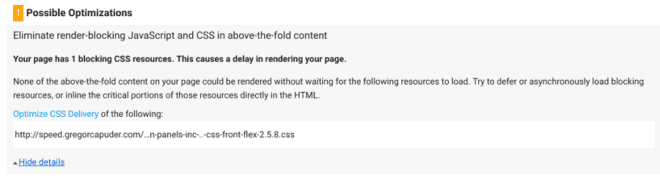
If we look at our example, the Google tool suggests that the Page Builder front-flex.css should be deferred or loaded asynchronously. We are using the Page Builder by SiteOrigin plugin for building content in our pages. So, if this file is responsible for making our layout of the page look good, then I might not respect Google suggestion and simply ignore it.
“But why would you disrespect Google? How dare you!” Well, this is only a tool and it gives you suggestions on what to do, but it does not know, if implementing some of these changes will break your site or ruin good user experience (UX) for your visitors. For example, if the tools had suggested that we load the style.css file with all the theme styles asynchronously, then it would have created the FOUC: Flash of unstyled content:
This is a bad UX, so I would ignore the suggestion from the tool and keep a good UX instead of improving our score. After all, Google is also using other factors it can gather from your website to rank it in the search results and user experience is one of them. When optimizing the website for speed, don’t follow the recommendations blindly and forget about all the other aspects and goals your WordPress website has.
When optimizing WordPress for speed, don’t forget about all other aspects. Share on XIf the files that the tool suggests to be loaded asynchronously are valid candidates and they don’t break anything, then of course we can implement that change. The best way is to just try to asynchronously load each suggested file and see, if the page still loads ok. Don’t forget to reload the page without browser cache, so that a fresh copy of the page loads. You can do that by hard refreshing your site.
We will look at how to load files asynchronously in the WP Rocket plugin section below. There are other standalone plugins that offer this functionality, but since the WP Rocket has it build in, we don’t need to pollute our WP installation with more plugins.
Server Side Caching
We’ve already talked about browser cache, but now we also have to take care of the server side cache. To understand server side caching we have to know the basics of how WordPress works, so let’s look at that first.
When a visitor opens a WordPress page, the following things happen (basic explanation):
- Server receives a page request.
- WordPress PHP code begins to execute.
- WordPress access the database to get the information it needs to build the requested page.
- WordPress produces the HTML.
- Server responds with the HTML for the browser to display it to the visitor.
These 5 steps have to be repeated for each page view, for each visitor. That’s a lot of repetitive work for content that stays the same for each visitor (if your site is displaying mostly static content, which majority of websites is).
Server side caching eliminates pretty much all the server’s hard work. It removes the need for repeating steps 2,3 and 4. So, when we enable server side caching, the process of a page request looks like this:
- Server receives a page request.
- Server retrieves the page HTML from the cache (if a cached version is available).
- Server responds with the HTML for the browser to display it to the visitor.
As you can see, the hard work of running the WordPress code and accessing the database is bypassed, which means that the page loading time should be much faster.
If we look at the Google PageSpeed Insights tool suggestions, we will spot the “Reduce server response time” task. The tool says that our server responded in 0.98 seconds, which is not good. The slow shared hosting I’m using is definitely to blame for some chunk of that 1 second response time, but we’ll be able to shorten it with server side caching.
Each page cache is usually saved with an expiration time of 24 hours, but that setting can be changed. This means that instead of thousands of page requests running the whole WordPress HTML building process, it will only be run once a day, to generate that cached page and the server will serve that cached page to other visitors. So, not only the page will be quicker, but the server will also have to do less work.
If you are updating a page in WordPress and an old cached version of the page is still available on your server, then you would have to clear that cache manually (usually with the click of a button) or some tools would do that for you automatically.
Some hosting companies already have a server side caching in place for their users, but this feature is usually available for managed WordPress hosting packages. So, before you follow instructions below, on how to setup server side caching, you should make sure that your server is not doing that for you already.
We will look at how to setup the WP Rocket plugin to enable server side caching and other features that it has (like lazy loading images, loading assets asynchronously, minification of JS and CSS files and much more). WP Rocket is a premium (paid) plugin, but I believe it’s worth the investment. If you don’t agree with me, that’s fine 🙂 WP Super Cache is a good free alternative, but it does not have the same extra features as WP Rocket and it’s a little bit more cumbersome to setup.
WP Rocket (server side caching plugin)
As soon as we install and activate the WP Rocket plugin it will have some basic features enabled out of the box:
- Caching of all the pages for quick viewing.
- Decrease bandwidth usage with our GZIP compression.
- Management of the headers (expires, etags…).
The WP Rocket plugin default settings are a good starting point.
I’ve run the page speed tools a couple of times, so that they picked up the cached version of the site and these are the new results:
- Google page speed insights
- Mobile: 91
- Desktop: 97
- GTmetrix
- PageSpeed: 97
- YSlow: 87
The Google PageSpeed Insights tool no longer displays the “Reduce server response time” optimization suggestion, because we reduced it from 1 second to 121ms, that’s a 88% improvement in server response time, just by activating the WP Rocket plugin! With this improvement, our fully loaded time is now 1.9 seconds, but we are not stopping here 🙂
Let’s look at the settings that WP Rocket plugin has to offer. WP Rocket has a nice shortcut menu in your top WP admin menu bar. From there, you can access the settings page, clear the cache and access other useful information regarding this plugin.
Before we continue and try out different WP Rocket settings, I would like to mention, that after every change you make, you should verify your site in an incognito/private browser tab. If you are logged into your WordPress site, then you will not see the cached version of the site. In the incognito browser tab you’ll not be logged in and you get a cached version of the site, so you can check, if it’s working ok.
Also know that enabling each WP Rocket setting might have different results or even negative effects on your WordPress speed, depending on which theme or plugins you are using, so just enabling all WP Rocket settings is not the way to go. You should try each setting and measure it with page speed tools, to see the difference. As you will see some techniques will not improve our page speed, therefore we will not be using them.
Clear Cache
Server side caching will start to work as soon as you activate the WP Rocket plugin, so let’s look at how we can clear it. You can manually clear cache, if you click on the menu item “Clear cache” in the WP Rocket shortcut menu. The plugin will also take care of clearing cache automatically, when you update customizer settings, change/update widgets, categories, … and it will partially clear cache when you update a page. For more information on when the automatic cache clearing will occur, please refer to this WP Rocket question.
The cache has a lifespan that can be set in the “Basic” tab of the WP Rocket settings. I suggest setting this to 1 day.

Preload cache
A nice feature of the WP Rocket is “Preload cache”, which will preload the cache of your home page and the pages that it links to, so your users will always get a cached version of the page. I could use this feature before I ran the page speed tools and I wouldn’t have to run the tools multiple times to get the cached version results.
The preload cache settings can be accessed in the settings page under the “Preload” tab. Look for the “Preload bot” option, there you will find a manual and an automatic option. If you enable the automatic bot option, the preload cache will run every time you update or create a page or if the cache expires. This option can influence the performance of your server so keep an eye on the performance logs if you enable it. If you are updating and creating a lot of posts/pages and you have a shared hosting, I would advise you to not enable this option. You should enable just the manual bot option instead, which will create another WP Rocket shortcut menu item, titled “Preload Cache” and it will preload the cache only when you click on it (after you are done editing posts and pages).
In the “Preload” settings tab, you will also find settings to preload the cache from a sitemap, so you can define a sitemap and it will use the URLs in the sitemap to preload the cache for those pages.
LazyLoad
I’ve already explained lazy loading images in the image optimization section of this article, but now that we have WP Rocket installed, we can actually enable this feature. Go to the “Basic” tab of the WP Rocket settings and enable the LazyLoad for images and if you are using any videos or iframes, then you can enable that as well.
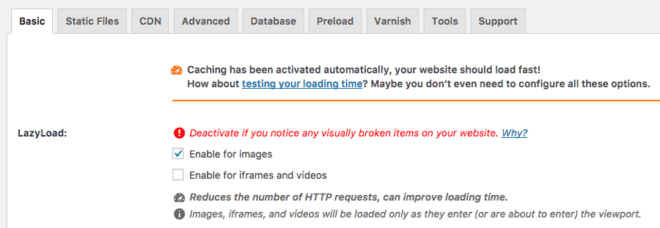
After you enable this feature, you should always check your site and see how the images load. LazyLoad might break your site layout or you might not like how the images are loaded (content jumping), so always check your pages. This feature is really handy, when you have a lot of images below-the-fold and it will help you reduce the number of image requests on the original page load. On our test site, we only have 5 images below-the-fold, so we saved 5 image requests and our page loading time is now down to 1.7 seconds, while the scores of the page speed tools stayed the same. This is a good indicator, that you can improve your page speed with certain tasks the tools do not suggest.
Minify Files
Some of the GTMetrix suggestions that we can still improve are to minify HTML, CSS and JS files. Because our WordPress theme and the majority of recommended plugins are already using minified versions for the JS/CSS files and we have Gzip enabled on our server, this WP Rocket optimization will not bring any significant improvements for our test site, but your case might be different. Go to the “Static Files” tab in the WP Rocket settings and check all 3 options under the Minify files option. Save the settings and go check your website in an incognito/private tab, so you can look for any issues that these options might bring to your site. In my test WordPress site, the CSS minification broke the page builder flexbox css file enqueue, so I had to disable the CSS minify file option. The HTML and JS options worked OK.
I asked WP Rocket support what the issue could be and they were nice enough to debug this issue on my site. The problem was caused by the Varnish cache used on my shared hosting. They suggested to change the Varnish configuration on my hosting server. I’ve contacted my hosting support and as I suspected, I can’t change the Varnish config on my shared hosting, but I would be able to, if I would upgrade to VPS hosting package. As you can see, using a shared hosting is not a good idea 🙂
If you had some issues with CSS or JS minification, you can add the file URL that was causing the issues to the box of excluded JS or CSS files. Finding the file responsible for the problems might be tricky, but usually you know which functionality is broken and which plugin is responsible for that functionality, so you check your page source code and inspect included files by that plugin. If the plugin has multiple JS or CSS files, then you can just try adding them to the exclude list and see, if the problem goes away.
Combine JS and CSS files
The YSlow tab in GTmetrix tool is telling us to “Make fewer HTTP requests”. It says that our WordPress is using 9 external JS scripts and that we should try to combine them into 1 and that the page is using 4 external CSS files and we should try to combine them into 1 file as well. If you remember, we’ve already removed the unneeded JS and CSS files in the Remove unneeded JS or CSS files section of this article.
Combining all JS and CSS files in one file is not a good idea, because browsers can download 6 smaller files in parallel, faster than 1-2 large files. The other reason is that some of the files are included in the head of HTML documents and other at the end of the document, so you have to split them in at least 2 files.
To combine files with WP Rocket, go to the “Static files” tab in the plugin settings and enable the options under Combine files. As always, verify your site in an incognito/private browser tab to check for any issues.
In our example, the WP Rocket had problems again, due to the shared hosting Varnish configuration issue mentioned above, so I had to disable JS combine files option.
Again, if you had some issues with CSS or JS concatenation, you can add the file url that was causing the issues to the box of excluded JS or CSS files, just like in the minification step above.
Remove query strings from static resources
GTMetrix recommends us to remove query strings from static resources, because some proxy servers do not cache resources with query strings.
Query strings in a static resource (usually JS or CSS file) is a URL attribute, which marks the version of the said file. It looks like this: ?ver=2.5.8 and it’s appended at the end of the URL: http://domain.com/css/front-flex.css?ver=2.5.8
We can easily remove these query strings with WP Rocket. Go to the “Static files” tab of the plugin settings and enable the Remove query strings option.
After enabling this option, our GTmetrix PageSpeed score changed to 98, but the page loading time did not change.
Render-blocking CSS/JS
The only Google PageSpeed Insights tool suggestion left is “Eliminate render-blocking JavaScript and CSS in above-the-fold content”. This means that there are some JS or CSS files blocking the loading of the page in the above-the-fold content. What the tool wants us to do, is to defer or asynchronously load these blocking resources.
Once again, the WP Rocket plugin comes to the rescue. Go to the “Static files” tab and look for the Render-blocking CSS/JS options. There you can enable the JS and CSS options that can solve this issue. Once you enable the JS option, a Safe mode (recommended) option will appear. This safe mode will load the jQuery library (WP default enqueued library) in the head of the page, leaving it as a blocking file, but it will not break any pages that have inline jQuery code on the page. Since jQuery is still loaded in the head, the PageSpeed tool is still complaining that we have a render-blocking JS file.
So, if I disable the safe mode for our test site, Google PageSpeed tool gives us a perfect score, 100 on mobile and 100 on desktop. Great, right? Not really! Our website still functions properly, but let’s look at how the website loads:
Flash of unstyled content (FOUC) can be fixed by utilizing the Critical path CSS option in the WP Rocket settings (just below the render-blocking CSS/JS option). The theory is, that you could add the CSS code needed for the above-the-fold part of the page, so that this flash effect of unstyled text would not appear on page load. This is harder than it sounds. There are tools that are supposed to generate this critical CSS for you, but I did not have much success with them.
To generate the critical path CSS code:
- Disable WP Rocket plugin on your site.
- Go to Critical Path CSS Generator tool.
- Enter your site URL and run it.
- Copy the critical path CSS code.
- Activate the WP Rocket plugin.
- Paste the CSS code to “Critical path CSS” box in WP Rocket settings.
- Check if there are any relative URL paths in the critical CSS code and change them to absolute paths.
This is how the loading of our WordPress test site looks like now:
It’s better, but I still don’t like it. Yeah, the Google PageSpeed score of 100/100 is great, but the total loading time is slower and we also have 2 more requests because we enabled this render blocking CSS/JS option. The main issue for me is still user experience of the page load, so I disabled this WP Rocket option.
WP Rocket is definitely a plugin that each WordPress website owner should use, since it has all the features to speed up your site. Just activating the plugin will give you a huge boost. Other features have to be tested for every website, since each theme and plugin can bring its own issues to the mix.
We’re almost at the end of our optimization steps. The only thing left, is to use a CDN for our website assets.
Content Delivery Network (CDN)
I’ve already mentioned a few times in this article, that page loading times differ, depending on the location of the server and the location of the visitor. For example, my shared hosting server that we are using for testing, is located in Austin, Texas (US) and at the beginning in the Pingdom page speed tool section of this article we tested 4 locations. Here are the results:
- Dallas, Texas (US) = 1.65s
- San Jose, California (US) = 2.53s
- Stockholm, Sweden (EU) = 3.06s
- Melbourne (AUS) = 5.38s
Now that we’ve optimized the site, with all steps mentioned in this article, our loading times are:
- Dallas, Texas (US) = 0.63s
- San Jose, California (US) = 0.76s
- Stockholm, Sweden (EU) = 1.21s
- Melbourne (AUS) = 2.24s
We will use these times to compare our WordPress loading time, when we setup our site to use a CDN.
We can see that these times are very different; that’s because the data has to travel a longer way from our server location to the Australian visitor, than to a visitor in Dallas. This is where a CDN will help us reduce those loading times.
A CDN is a geographically distributed network of server proxies and their data centers. Their primary goal is to distribute your site content to your visitors from a server closest to the visitor. This means, that your website static content (images, JS, CSS, …) will be served by their servers, which are spread around the world, making your site faster to load for everybody.
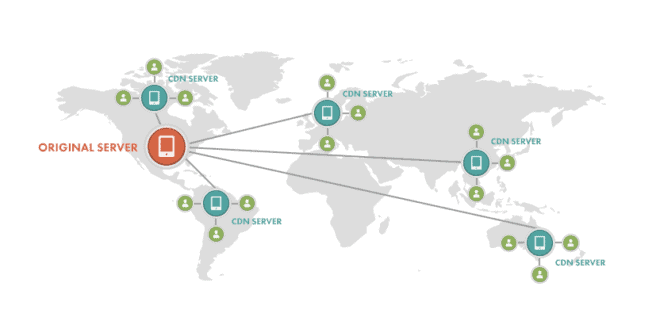
Utilizing a WordPress CDNhas a multitude of benefits including:
- Decreasing latency, which is the time and or delay the distance has to travel.
- Reduces time to first byte (TTFB), which is a measurement of how long the browser has to wait before receiving its first byte of data from the server.
- Serves content from cache for faster page load times and less strain on your hosting (origin) server.
- Utilizes HTTP/2 over secure connections to take advantage of multiplexing, parallelism, server push, and HPACK compression.
- Compresses data with GZIP or Brotli to ensure smaller HTML, stylesheets, and JavaScript files.
CDNs these days offer a bunch of other features, especially in the security department. They usually offer DDoS protection, bots detection/prevention and so on.
We will look at one of the more popular CDNs, called Cloudflare. They offer a free package, which includes the use of their global CDN and that’s what we need.
Cloudflare
First go to cloudflare.com and sign up for a new free account. After you create an account, you will have to set-up your website on Cloudflare, in order for it to serve your static content (assets).
When you login to your new Cloudflare account, you will be asked to add your website (domain) in order to automatically retrieve the DNS records.
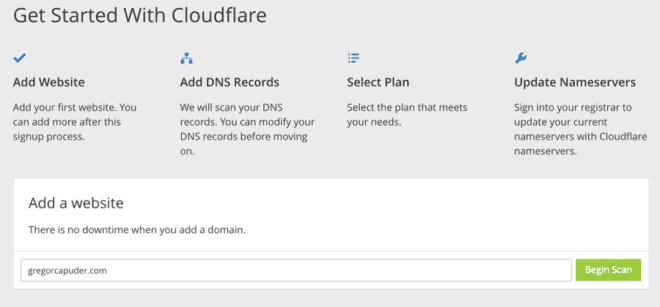
Input your domain and click on “Begin Scan”. Even though I’m using a subdomain (speed.gregorcapuder.com), I had to input only the root domain: gregorcapuder.com. The scanning part took about a minute to complete and in the meantime, you can watch a short video, which will explain what is going on. After the scanning is done, you can click on the “Continue” button.
In the next step, you will see all DNS records that Cloudflare could find for our domain. Here you have to add any records that might be missing, so go through the list and check, if something is missing. In our example, the speed subdomain was missing, so I added it to the list. In the name input I entered “speed” (name of my subdomain), in the IPv4 address I entered the same IP address as my main domain (gregorcapuder.com) and then I clicked “Add Record”. As you can see in the screenshot below, I’ve enabled Cloudflare for my main domain as well as for the speed subdomain (marked by an orange cloud with an arrow running behind the cloud). This means, that on these two websites, the traffic will be handled and protected by Cloudflare.

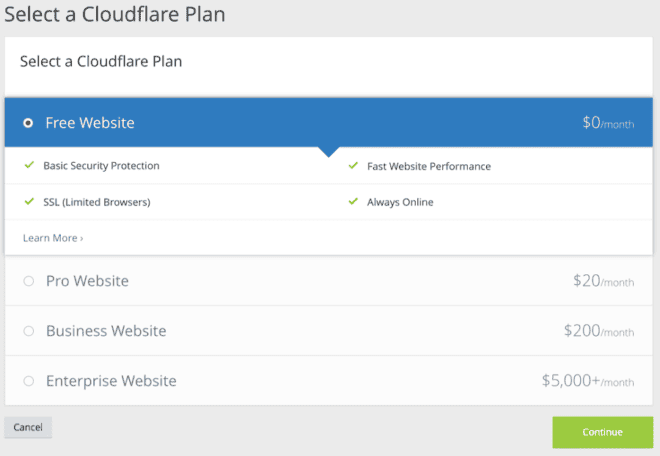
When you are done with the DNS records, you can continue to the next step, where you select the “Free Website” plan and continue on.
The last step to enable the Cloudflare for your website, is to login to your domain registrar’s dashboard (where you bought your domain from) and change the nameservers for your domain. It’s stated, that it can take up to 48 hours for the new nameservers to take effect, but in my case, it was updated in 1 hour. There will be no website downtime in the meantime, so don’t worry.
Once the nameservers are updated for your site, you will see the status of your Cloudflare website change to “active”.
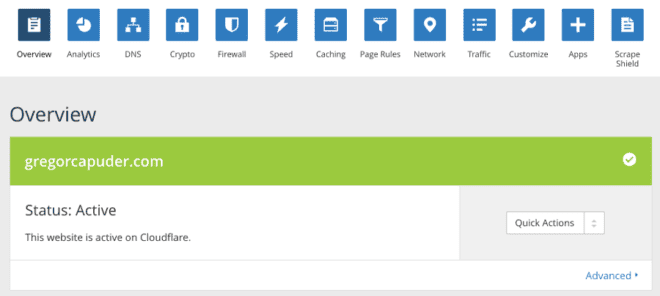
I’ve left all Cloudflare settings in the dashboard at default, the only thing I changed was the security level. Go to the Firewall tab and adjust the “Security Level” to Low. That’s because I don’t want my visitors to get a “challenge page” on a false attacker detection.
Now, that we setup the Cloudflare side, we should also enable the Cloudflare settings on our WP Rocket plugin.
Login to your WordPress admin dashboard and go to the WP Rocket plugin settings. Navigate to the “CDN” tab, enable the Show Cloudflare settings tab and save the settings. This will show a new “Cloudflare” tab in the WP Rocket settings and you should open it. There you should input the Cloudflare account email, the domain and you should also copy & paste the Cloudflare global API key. To retrieve the global API key, go to Cloudflare dashboard (overview tab) and click on the “Get your API key” link. You will see a section “API key” on this new page and you should click on the “View API key” button for the “Global API Key” row. Once you paste in the global API key into the WP Rocket settings, I would also suggest enabling the “Optimal settings” option in WP Rocket. Save the settings and then click on the “Clear Cloudflare cache” button, just to verify that everything is working OK.
Now, that the CDN is configured, we can test the loading times from different locations again and see the improvements (Pingdom tests).
- Dallas, Texas (US) = 0.54s
- San Jose, California (US) = 0.70s
- Stockholm, Sweden (EU) = 0.91s
- Melbourne (AUS) = 1.16s
As expected, the European and Australian loading times have improved the most. And all our loading times are around 1 second mark, or lower. That is a great loading time!
When you’re testing your site, don’t test it with just one run of the page speed tool for one location. You need to test it out a couple of times. When you first run the tool for a certain location, the cached files have to be first stored on the closest Cloudflare server, each subsequent test should show you the true loading time of the cached version. I would suggest that you test 3-5 times, to get a good average of how fast your page will load from particular location.
Final Results
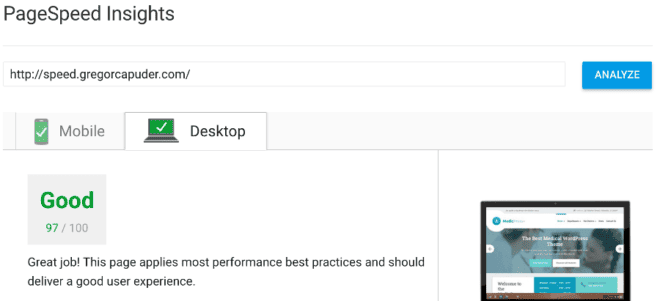
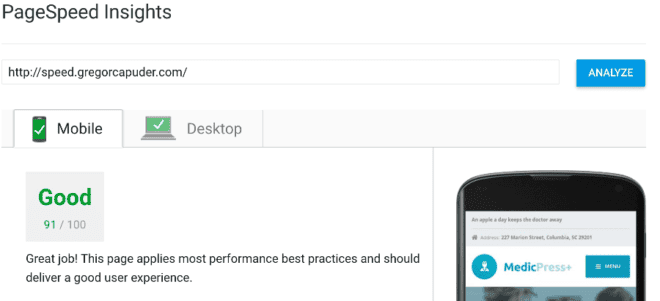
Our final page speed tool scores are:
- Google PageSpeed insights
- Mobile: 91
- Desktop: 97
- GTmetrix
- PageSpeed: 98
- YSlow: 91
Here are the screenshots:
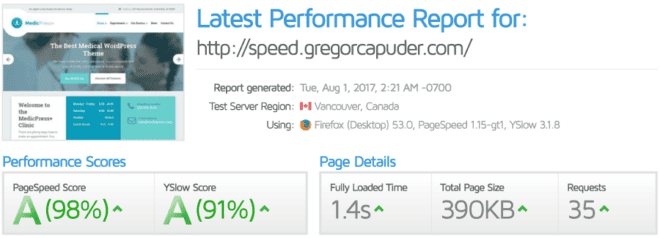
Let’s compare the GTmetrix data before and after our optimization:
| Before | After | |
| PageSpeed score | 77 | 98 |
| YSlow score | 71 | 91 |
| Fully loaded time | 3.1s | 1.4s |
| Total page size | 803KB | 390KB |
| Number of requests | 54 | 35 |
We’ve improved our webiste performance in every way. The website loads faster, it takes less requests to display the site to the user, it takes less bandwidth and it loads fast for visitors across the world. At the same time, we kept all functionality and styling of our website as it was at the beginning. Awesome! 🙂
For the end we’ve prepared a nice visual representation of the results for each individual optimization step we completed:
Conclusion
In this ultimate WordPress page speed optimization guide, we looked at the more important steps you can undertake to drastically improve your website performance. Following the advice in this article will make your site lean and fast, which will improve your page loading time and therefore user experience. These improvements might also bring in more money and help you save it some on the server costs, so it’s a win-win for everyone!
I would like to conclude this article by saying, that speed is not everything, it’s another piece of a website puzzle. We build websites for humans, potential clients, so always have that in mind. Find a good balance between content, multimedia, design, user experience and page speed. Don’t be obsessed about page speed and page speed tool scores. As long as you improve your visitors experience, your goal will be achieved.
Don’t overthink page speed tool scores. As long as you improve UX your goal is achieved. Share on XDid I miss any website optimization step, that you think can bring in a crucial improvement to the page load time? Let me know in the comments below!
If you find our article useful and you followed its steps, please let me know in the comments below, what kind of improvements you have achieved.